
Teslamate: Kostenfreie Google Cloud Installation
Anbei eine Schritt für Schritt Anleitung um Teslamate in der kostenfreien Google Cloud Variante zu installieren und zu betreiben. Allgemeine Voraussetzung: Google Account. Haben oder neu erstellen.
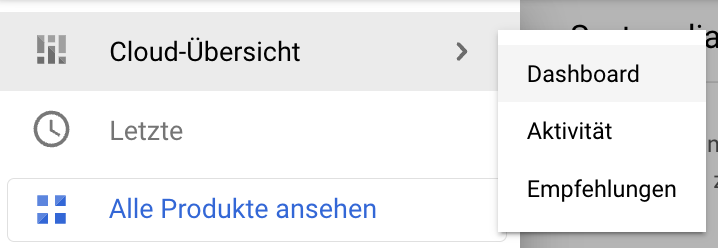
Anmeldung Google Cloud
Mit dem Browser die Google Cloud Startseite aufrufen und kostenlos starten (oben rechts in der Ecke):
 .
.
Anschließend mit dem entsprechenden Google Account anmelden. Wenn man bereits in der Vergangenheit eine kostenlose Testphase (z.B. mit Guthaben) genutzt hat, dann muss man jetzt ein “vollständiges Konto” registrieren / aktivieren. Anschließend nutzt man die kostenfrei nutzbaren Dienste:
Google Cloud: Projekt erstellen
Zum Start wird man noch kein Projekt haben, kann aber im Zweifelsfall auf dem Dashboard die Projekte sehen oder ein Neues erstellen (Links oben):
 .
.
Anschließend dann auf “PROJEKT ERSTELLEN” auswählen:  .
.
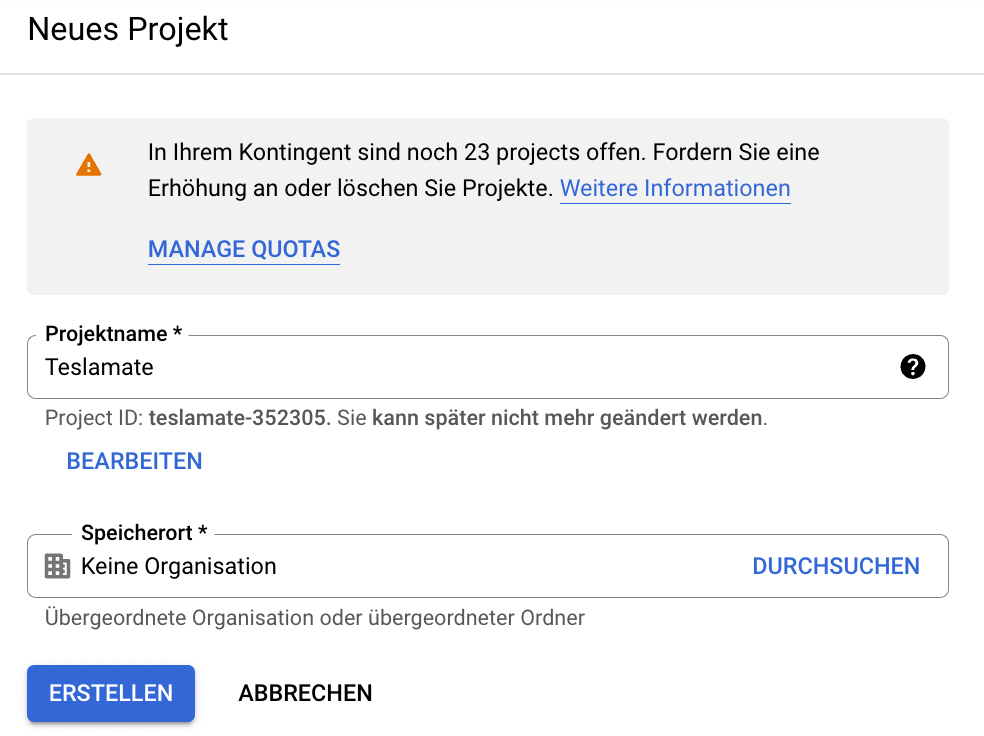
Auf der dann folgenden Seite für das neue Projekt den Projektnamen ausfüllen und “ERSTELLEN”:
Das dauert dann einen Moment und anschließend lädt das Dashboard.
Virtuelle Maschine für Teslamate erstellen
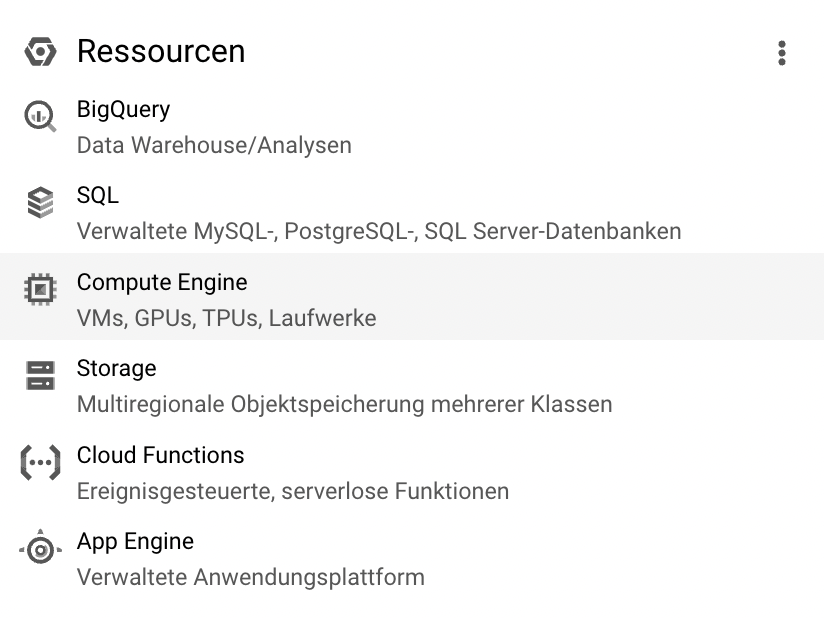
Unter den Ressourcen wählt dann “Compute Engine” auswählen:
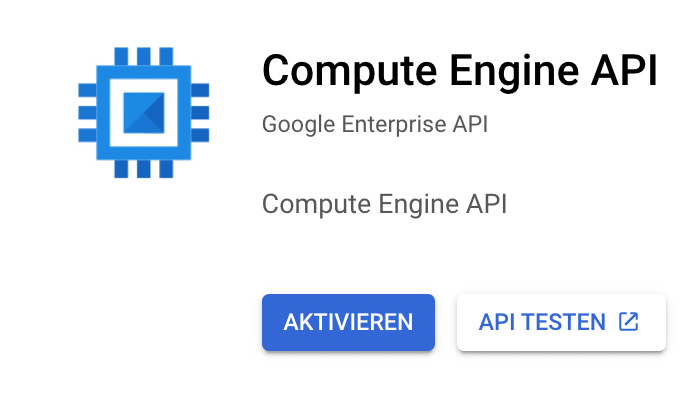
Anschließend die Compute Engine API aktivieren (dauert wesentlich länger als die Erstellung des Projektes):
Anschließend sieht das Dashboard in etwa so aus:
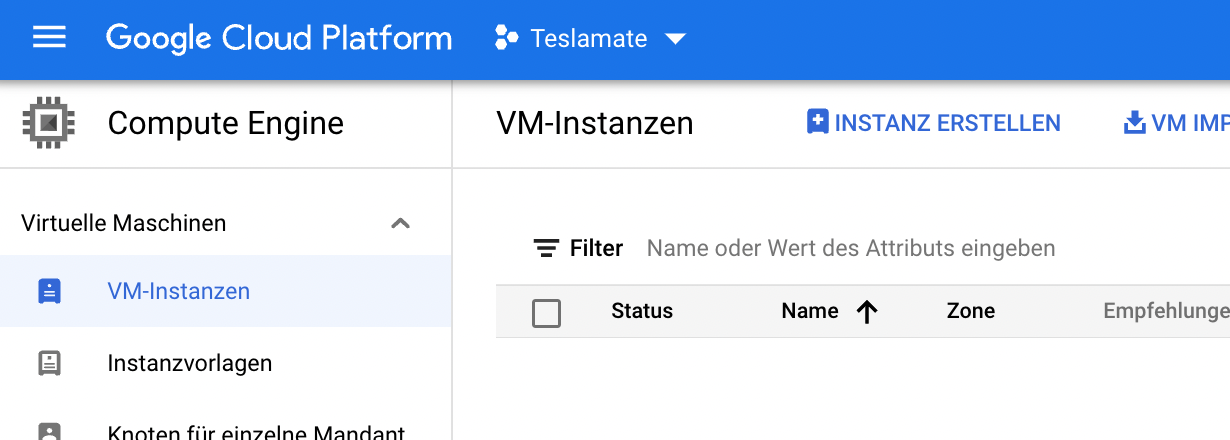
Nächster Schritt: Instanz erstellen

Im folgenden Dialog füllen wir dann den Namen (docker-teslamate) aus, wählen als Region us-central1 (Iowa) aus, falls diese noch nicht ausgewählt ist und anschließend als Reihe der Maschine “E2” sowie als Maschinentyp “e2-micro”:
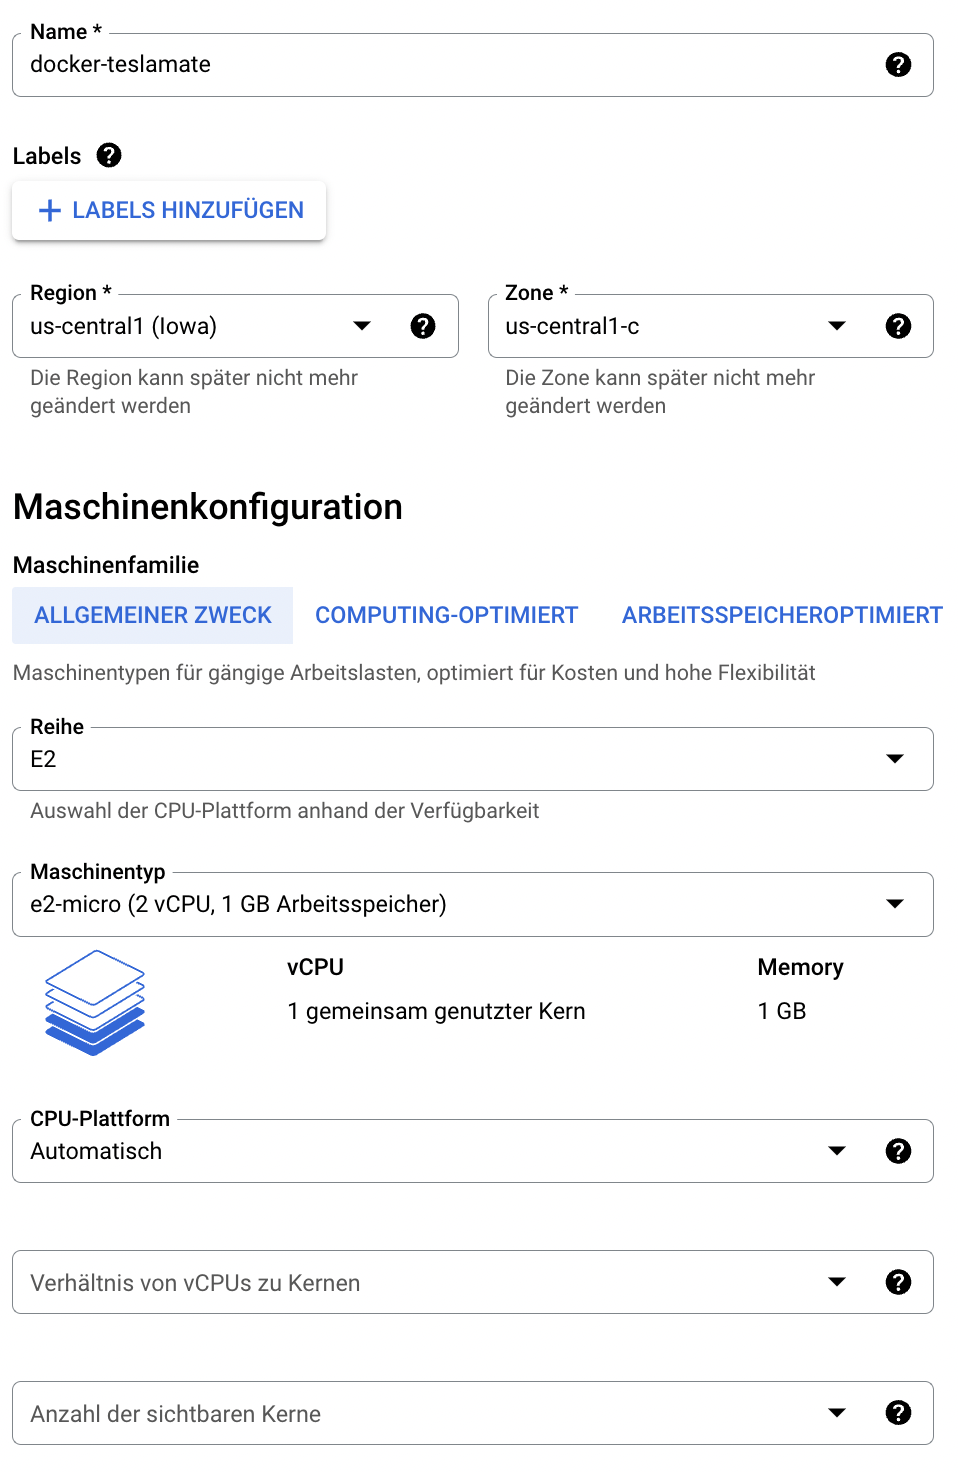
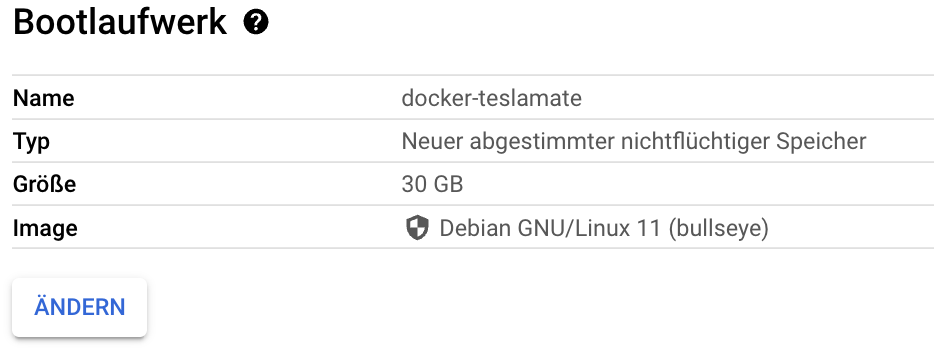
Oben rechts werden die erwarteten Kosten angezeigt - diese sind eine Schätzung, was so eine Instanz kosten würde. Diese Instanz wird nichts kosten, da diese in der kostenfreien Nutzung enthalten ist. Weiterhin noch die Größe des Bootlaufwerkes auf 30GB ändern:
Anschließend unten auf “ERSTELLEN” klicken um die Instanz zu erstellen. Während der Erstellung sieht es dann so aus:
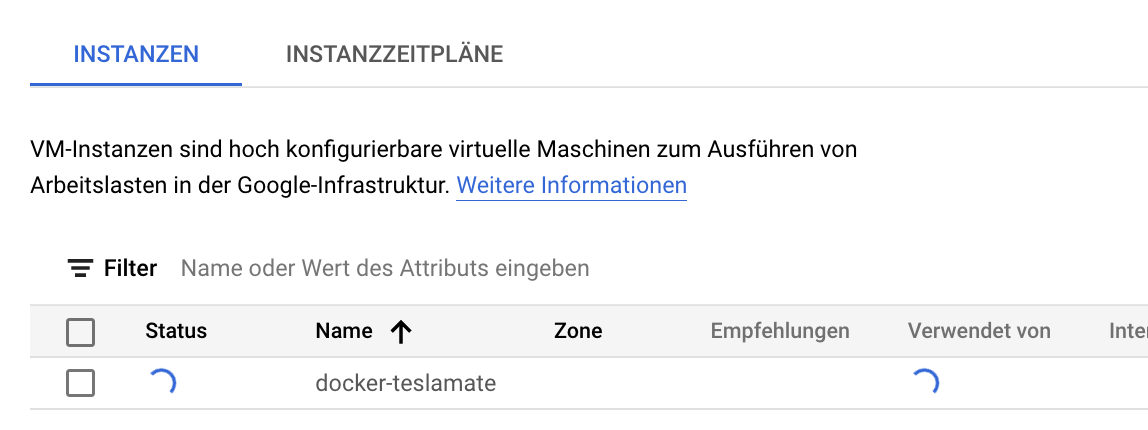
Wenn die Erstellung fertig ist, sieht das Ganze dann so aus:

DuckDNS
Um sicher (verschlüsselt) auf Teslamate zuzugreifen benötigen wir jetzt einerseits eine Portfreischaltung für die virtuelle Maschine, einen Hostnamen unter dem unser Teslamate erreichbar ist sowie Zertifikate für die Verschlüsselung. Um keine Domain zu registrieren nehmen wir dazu DuckDNS. Dort loggen wir uns mit unserem Google Konto ein (“Sign in with Google”) und beantragen einen DNS Namen:
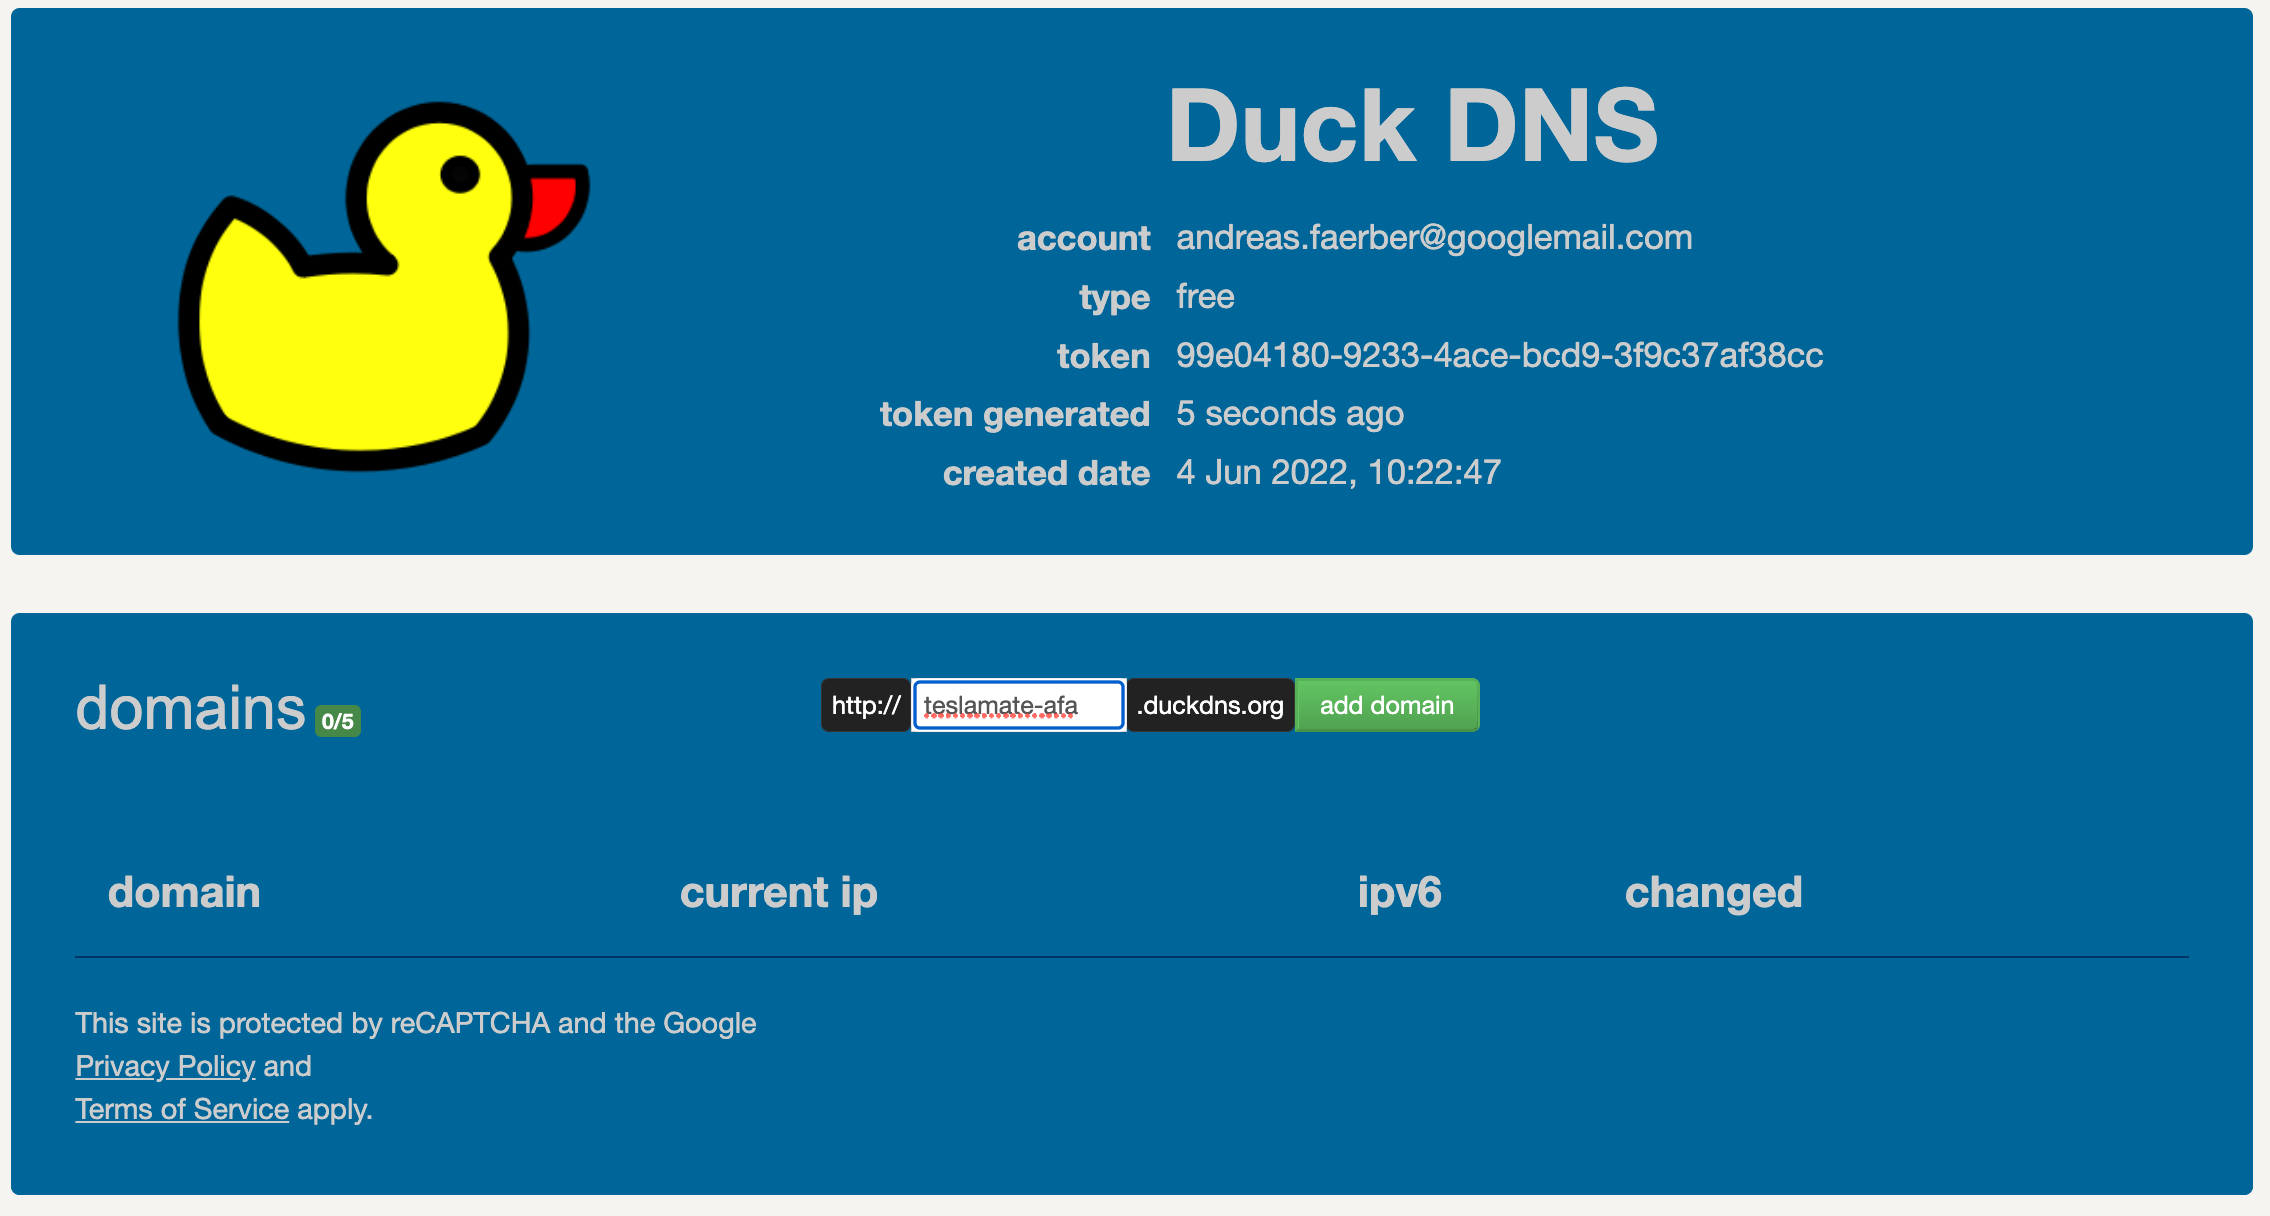
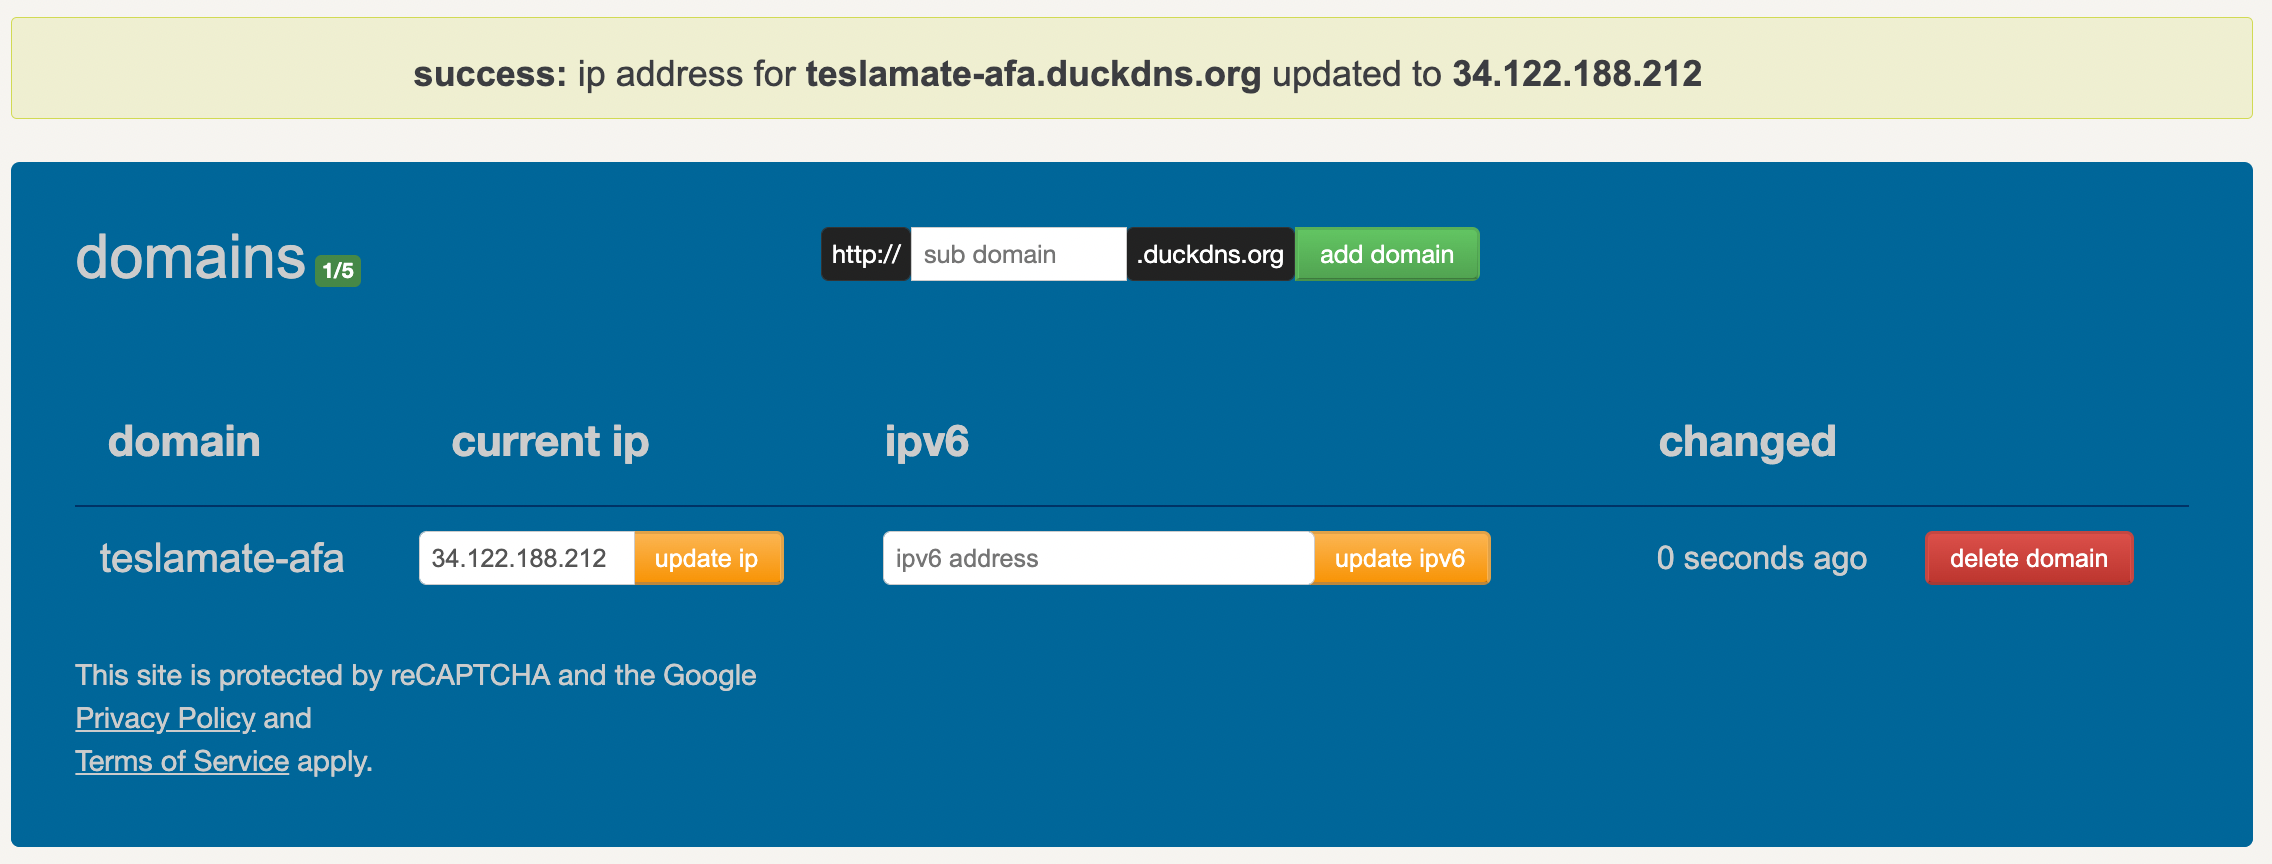
Anschließend tragen wir dort unsere externe IP-Adresse der virtuellen Maschine ein. Diese bekommen wir aus dem Google Compute Dashboard:

Eingetragen bei DuckDNS:
Es kann einen Moment dauern, bis der Name den wir eingetragen haben, im DNS bekannt ist. Daher machen wir das relativ am Anfang, so dass das zum Ende hin bereits passiert ist.
System aktualisieren und Docker installieren
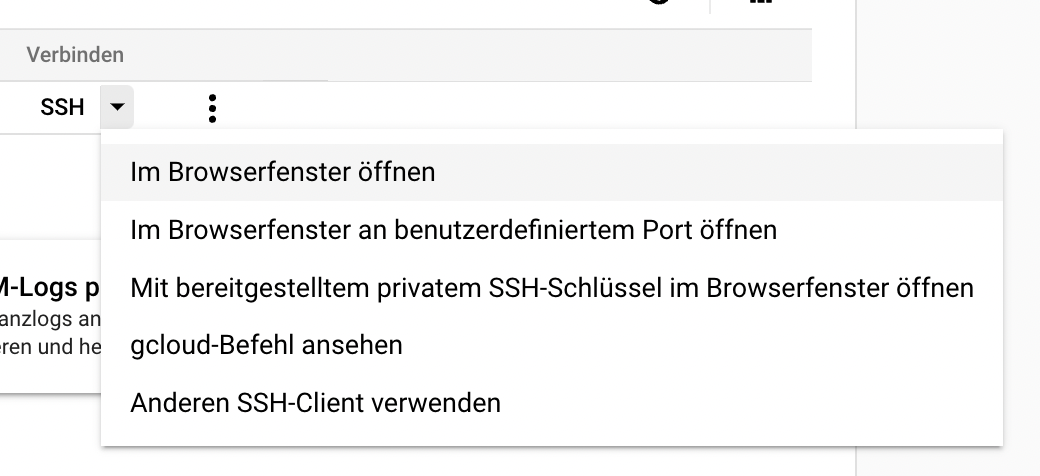
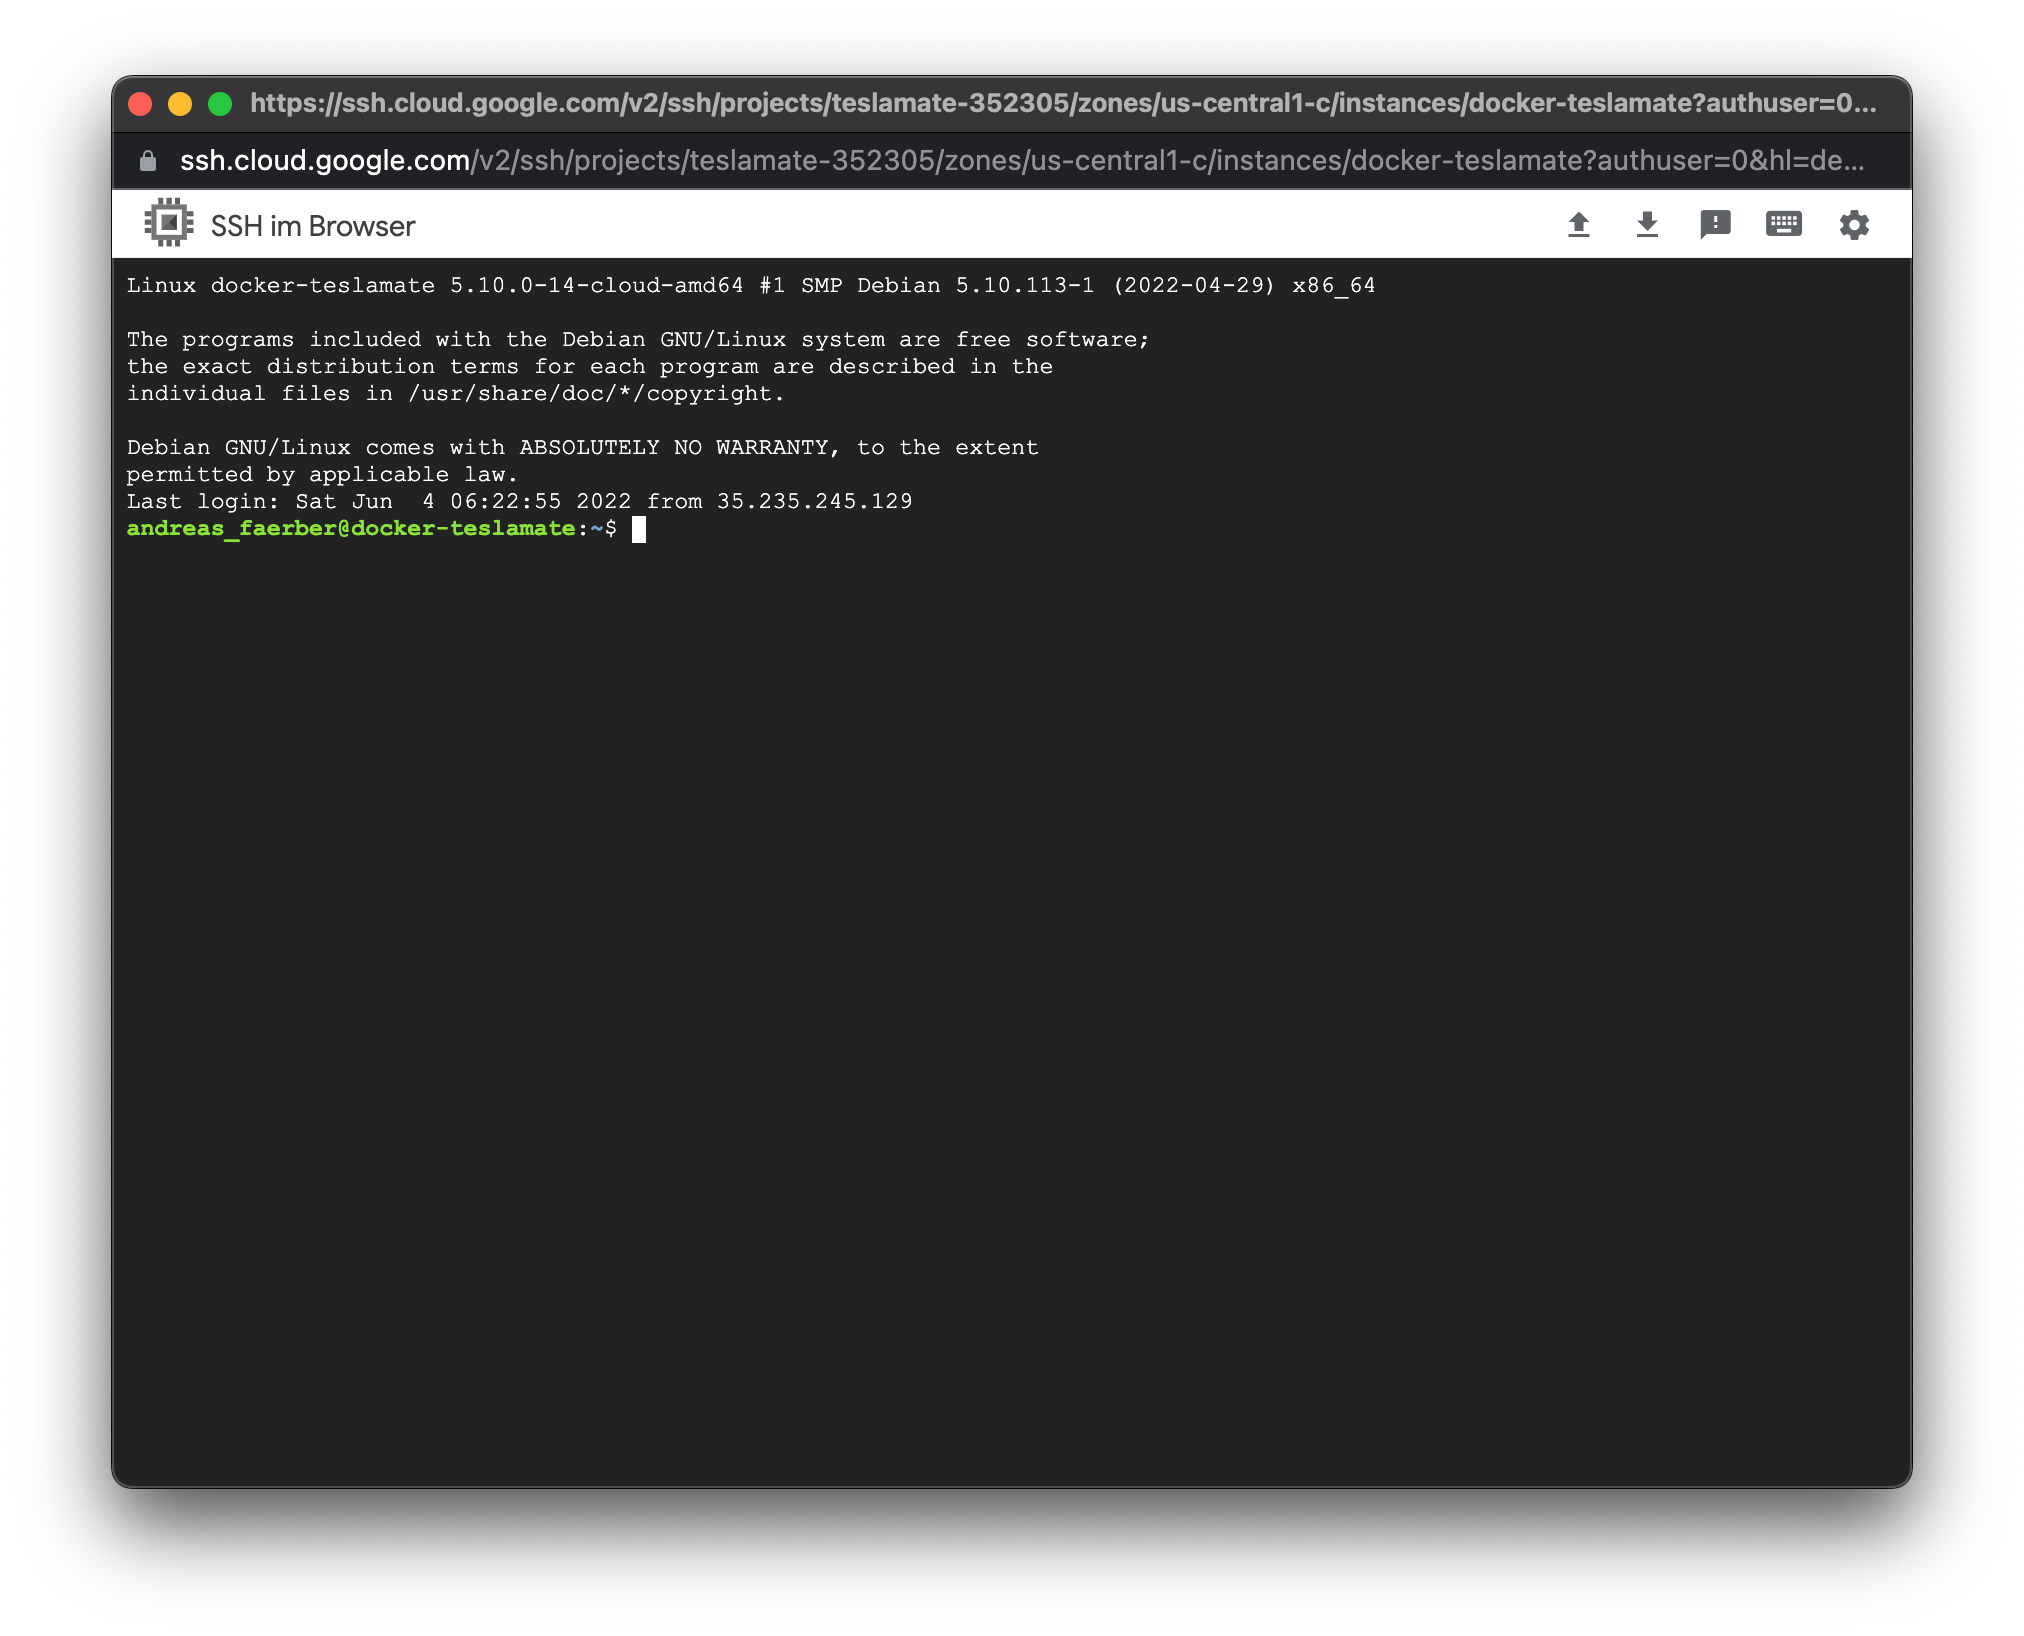
Wir verbinden uns mit der Instanz über den Webbrowser:
Das Konsolenfenster der Instanz sieht dann wie folgt aus:
Ab jetzt die jeweiligen Kommandos im gerade eröffneten Konsolenfenster eintippen. Im weiteren Verlauf werden die Konsolenkommandos mit eingaben und Ausgaben (teilweise gekürzt) angezeigt anstelle von Screenshots.
Das System aktualisieren:
Hinweis vorab: Die virtuelle Maschine kostet nichts - daher ist diese auch nicht besonders schnell. Das heisst, dass die Kommandos manchmal einige Zeit dauern, bis diese fertig sind. Ein wenig Geduld mitbringen - das “dist-upgrade” hat bei mir gefühlt 20 Minuten gedauert, bis das durch war.
Genutzte Kommandos (Um diese von hier zu kopieren und in der Konsole einzufügen - am besten eine Zeile kopieren, einfügen, ausführen, Ausgabe abwarten, nächste Zeile kopieren, einfügen, ausführen, etc):
sudo apt update

sudo apt -y dist-upgrade
Ausgaben auf der Konsole:
andreas_faerber@docker-teslamate:~$ sudo apt update
sudo apt -y dist-upgrade
Get:1 http://packages.cloud.google.com/apt cloud-sdk-bullseye InRelease [6778 B]
Hit:2 http://deb.debian.org/debian bullseye InRelease
Get:3 http://packages.cloud.google.com/apt google-cloud-packages-archive-keyring-bullseye InRelease [5557 B]
Get:4 http://deb.debian.org/debian bullseye-updates InRelease [39.4 kB]
Get:5 http://packages.cloud.google.com/apt google-compute-engine-bullseye-stable InRelease [5533 B]
Get:6 http://deb.debian.org/debian bullseye-backports InRelease [44.2 kB]
Get:7 http://security.debian.org/debian-security bullseye-security InRelease [44.1 kB]
Get:8 http://packages.cloud.google.com/apt cloud-sdk-bullseye/main amd64 Packages [125 kB]
Get:9 http://packages.cloud.google.com/apt google-cloud-packages-archive-keyring-bullseye/main amd64 Packages [390 B]
Get:10 http://deb.debian.org/debian bullseye-updates/main Sources.diff/Index [7239 B]
Get:11 http://deb.debian.org/debian bullseye-updates/main amd64 Packages.diff/Index [7239 B]
Get:12 http://deb.debian.org/debian bullseye-updates/main Sources T-2022-05-28-1407.13-F-2022-05-28-1407.13.pdiff [238 B]
Get:12 http://deb.debian.org/debian bullseye-updates/main Sources T-2022-05-28-1407.13-F-2022-05-28-1407.13.pdiff [238 B]
Get:13 http://deb.debian.org/debian bullseye-updates/main amd64 Packages T-2022-05-28-1407.13-F-2022-05-28-1407.13.pdiff [1087 B]
Get:13 http://deb.debian.org/debian bullseye-updates/main amd64 Packages T-2022-05-28-1407.13-F-2022-05-28-1407.13.pdiff [1087 B]
Get:14 http://deb.debian.org/debian bullseye-backports/main Sources.diff/Index [63.3 kB]
Get:15 http://deb.debian.org/debian bullseye-backports/main amd64 Packages.diff/Index [63.3 kB]
Get:16 http://deb.debian.org/debian bullseye-backports/main Translation-en.diff/Index [63.3 kB]
Get:17 http://security.debian.org/debian-security bullseye-security/main Sources [124 kB]
Get:18 http://security.debian.org/debian-security bullseye-security/main amd64 Packages [153 kB]
Get:19 http://security.debian.org/debian-security bullseye-security/main Translation-en [95.1 kB]
Get:20 http://deb.debian.org/debian bullseye-backports/main Sources T-2022-06-04-2006.24-F-2022-05-20-0209.05.pdiff [35.3 kB]
Get:20 http://deb.debian.org/debian bullseye-backports/main Sources T-2022-06-04-2006.24-F-2022-05-20-0209.05.pdiff [35.3 kB]
Get:21 http://deb.debian.org/debian bullseye-backports/main amd64 Packages T-2022-06-04-2006.24-F-2022-05-18-2004.12.pdiff [51.3 kB]
Get:22 http://deb.debian.org/debian bullseye-backports/main Translation-en T-2022-05-24-1409.58-F-2022-05-21-1406.25.pdiff [19.9 kB]
Get:22 http://deb.debian.org/debian bullseye-backports/main Translation-en T-2022-05-24-1409.58-F-2022-05-21-1406.25.pdiff [19.9 kB]
Get:21 http://deb.debian.org/debian bullseye-backports/main amd64 Packages T-2022-06-04-2006.24-F-2022-05-18-2004.12.pdiff [51.3 kB]
Fetched 955 kB in 1s (689 kB/s)
Reading package lists... Done
Building dependency tree... Done
Reading state information... Done
6 packages can be upgraded. Run 'apt list --upgradable' to see them.
Reading package lists... Done
Building dependency tree... Done
Reading state information... Done
Calculating upgrade... Done
The following packages will be upgraded:
  dpkg google-cloud-packages-archive-keyring google-cloud-sdk libldap-2.4-2 libldap-common rsyslog
6 upgraded, 0 newly installed, 0 to remove and 0 not upgraded.
Need to get 137 MB of archives.
After this operation, 1745 kB of additional disk space will be used.
Get:1 http://packages.cloud.google.com/apt google-cloud-packages-archive-keyring-bullseye/main amd64 google-cloud-packages-archive-keyring all 1.2-451894399 [5144 B]
Get:2 http://packages.cloud.google.com/apt cloud-sdk-bullseye/main amd64 google-cloud-sdk all 388.0.0-0 [133 MB]
Get:3 http://security.debian.org/debian-security bullseye-security/main amd64 dpkg amd64 1.20.10 [2529 kB]
Get:4 http://security.debian.org/debian-security bullseye-security/main amd64 rsyslog amd64 8.2102.0-2+deb11u1 [703 kB]
Get:5 http://security.debian.org/debian-security bullseye-security/main amd64 libldap-2.4-2 amd64 2.4.57+dfsg-3+deb11u1 [232 kB]
Get:6 http://security.debian.org/debian-security bullseye-security/main amd64 libldap-common all 2.4.57+dfsg-3+deb11u1 [95.8 kB]
Fetched 137 MB in 2s (66.5 MB/s)
(Reading database ... 52381 files and directories currently installed.)
Preparing to unpack .../dpkg_1.20.10_amd64.deb ...
Unpacking dpkg (1.20.10) over (1.20.9) ...
Setting up dpkg (1.20.10) ...
(Reading database ... 52390 files and directories currently installed.)
Preparing to unpack .../rsyslog_8.2102.0-2+deb11u1_amd64.deb ...
Unpacking rsyslog (8.2102.0-2+deb11u1) over (8.2102.0-2) ...
Preparing to unpack .../google-cloud-packages-archive-keyring_1.2-451894399_all.deb ...
Unpacking google-cloud-packages-archive-keyring (1.2-451894399) over (1.2-448994988) ...
Preparing to unpack .../google-cloud-sdk_388.0.0-0_all.deb ...
Unpacking google-cloud-sdk (388.0.0-0) over (386.0.0-0) ...
Preparing to unpack .../libldap-2.4-2_2.4.57+dfsg-3+deb11u1_amd64.deb ...
Unpacking libldap-2.4-2:amd64 (2.4.57+dfsg-3+deb11u1) over (2.4.57+dfsg-3) ...
Preparing to unpack .../libldap-common_2.4.57+dfsg-3+deb11u1_all.deb ...
Unpacking libldap-common (2.4.57+dfsg-3+deb11u1) over (2.4.57+dfsg-3) ...
Setting up rsyslog (8.2102.0-2+deb11u1) ...
Setting up libldap-2.4-2:amd64 (2.4.57+dfsg-3+deb11u1) ...
Setting up libldap-common (2.4.57+dfsg-3+deb11u1) ...
Setting up google-cloud-packages-archive-keyring (1.2-451894399) ...
Setting up google-cloud-sdk (388.0.0-0) ...
Processing triggers for man-db (2.9.4-2) ...
Processing triggers for libc-bin (2.31-13+deb11u3) ...
andreas_faerber@docker-teslamate:~$
(auf das Dreieck klicken um die Ausführung auf der Console zu sehen)
Docker Installation:
Genutzte Kommandos (Immer jeweils genau eine Zeile kopieren und auf der Konsole einfügen):
sudo apt -y remove docker docker-engine docker.io containerd runc

sudo apt -y install ca-certificates curl gnupg lsb-release

sudo mkdir -p /etc/apt/keyrings

curl -fsSL https://download.docker.com/linux/debian/gpg | sudo gpg --dearmor -o /etc/apt/keyrings/docker.gpg

echo "deb [arch=$(dpkg --print-architecture) signed-by=/etc/apt/keyrings/docker.gpg] https://download.docker.com/linux/debian $(lsb_release -cs) stable" | sudo tee /etc/apt/sources.list.d/docker.list > /dev/null

sudo apt update

sudo apt -y install docker-ce docker-ce-cli containerd.io docker-compose-plugin apache2-utils docker-compose

sudo docker run hello-world
Ausgaben auf der Konsole:
andreas_faerber@docker-teslamate:~$ sudo apt -y remove docker docker-engine docker.io containerd runc
Reading package lists... Done
Building dependency tree... Done
Reading state information... Done
E: Unable to locate package docker-engine
andreas_faerber@docker-teslamate:~$ sudo apt-get install ca-certificates curl gnupg lsb-release
Reading package lists... Done
Building dependency tree... Done
Reading state information... Done
ca-certificates is already the newest version (20210119).
ca-certificates set to manually installed.
curl is already the newest version (7.74.0-1.3+deb11u1).
gnupg is already the newest version (2.2.27-2+deb11u1).
gnupg set to manually installed.
lsb-release is already the newest version (11.1.0).
lsb-release set to manually installed.
0 upgraded, 0 newly installed, 0 to remove and 0 not upgraded.
andreas_faerber@docker-teslamate:~$ sudo mkdir -p /etc/apt/keyrings
andreas_faerber@docker-teslamate:~$
andreas_faerber@docker-teslamate:~$ curl -fsSL https://download.docker.com/linux/debian/gpg | sudo gpg --dearmor -o /etc/apt/keyrings/docker.gpg
andreas_faerber@docker-teslamate:~$
andreas_faerber@docker-teslamate:~$ echo "deb [arch=$(dpkg --print-architecture) signed-by=/etc/apt/keyrings/docker.gpg] https://download.docker.com/linux/debian $(lsb_release -cs) stable" | sudo tee /etc/apt/sources.list.d/docker.list > /dev/null
andreas_faerber@docker-teslamate:~$
andreas_faerber@docker-teslamate:~$ sudo apt update
Hit:1 http://packages.cloud.google.com/apt cloud-sdk-bullseye InRelease
Hit:2 http://deb.debian.org/debian bullseye InRelease
Hit:3 http://packages.cloud.google.com/apt google-cloud-packages-archive-keyring-bullseye InRelease
Hit:4 http://deb.debian.org/debian bullseye-updates InRelease
Hit:5 http://packages.cloud.google.com/apt google-compute-engine-bullseye-stable InRelease
Hit:6 http://deb.debian.org/debian bullseye-backports InRelease
Get:7 https://download.docker.com/linux/debian bullseye InRelease [43.3 kB]
Hit:8 http://security.debian.org/debian-security bullseye-security InRelease
Get:9 https://download.docker.com/linux/debian bullseye/stable amd64 Packages [10.8 kB]
Fetched 54.1 kB in 1s (60.0 kB/s)
Reading package lists... Done
Building dependency tree... Done
Reading state information... Done
All packages are up to date.
andreas_faerber@docker-teslamate:~$
andreas_faerber@docker-teslamate:~$ sudo apt -y install docker-ce docker-ce-cli containerd.io docker-compose-plugin apache2-utils docker-compose
Reading package lists... Done
Building dependency tree... Done
Reading state information... Done
The following additional packages will be installed:
  dbus-user-session docker-ce-rootless-extras docker-scan-plugin git git-man libapr1 libaprutil1 libcurl3-gnutls
  liberror-perl libgdbm-compat4 libltdl7 libperl5.32 libslirp0 libyaml-0-2 patch perl perl-modules-5.32 pigz python3-attr
  python3-cached-property python3-certifi python3-chardet python3-distutils python3-docker python3-dockerpty
  python3-docopt python3-idna python3-importlib-metadata python3-jsonschema python3-lib2to3 python3-more-itertools
  python3-pkg-resources python3-pyrsistent python3-requests python3-setuptools python3-six python3-texttable
  python3-urllib3 python3-websocket python3-yaml python3-zipp slirp4netns
Suggested packages:
  aufs-tools cgroupfs-mount | cgroup-lite git-daemon-run | git-daemon-sysvinit git-doc git-el git-email git-gui gitk
  gitweb git-cvs git-mediawiki git-svn ed diffutils-doc perl-doc libterm-readline-gnu-perl | libterm-readline-perl-perl
  make libtap-harness-archive-perl python-attr-doc python-jsonschema-doc python3-cryptography python3-openssl
  python3-socks python-requests-doc python-setuptools-doc
Recommended packages:
  docker.io
The following NEW packages will be installed:
  apache2-utils containerd.io dbus-user-session docker-ce docker-ce-cli docker-ce-rootless-extras docker-compose
  docker-compose-plugin docker-scan-plugin git git-man libapr1 libaprutil1 libcurl3-gnutls liberror-perl libgdbm-compat4
  libltdl7 libperl5.32 libslirp0 libyaml-0-2 patch perl perl-modules-5.32 pigz python3-attr python3-cached-property
  python3-certifi python3-chardet python3-distutils python3-docker python3-dockerpty python3-docopt python3-idna
  python3-importlib-metadata python3-jsonschema python3-lib2to3 python3-more-itertools python3-pkg-resources
  python3-pyrsistent python3-requests python3-setuptools python3-six python3-texttable python3-urllib3 python3-websocket
  python3-yaml python3-zipp slirp4netns
0 upgraded, 48 newly installed, 0 to remove and 0 not upgraded.
Need to get 126 MB of archives.
After this operation, 545 MB of additional disk space will be used.
Get:1 http://deb.debian.org/debian bullseye/main amd64 perl-modules-5.32 all 5.32.1-4+deb11u2 [2823 kB]
Get:2 https://download.docker.com/linux/debian bullseye/stable amd64 containerd.io amd64 1.6.4-1 [28.1 MB]
Get:3 http://deb.debian.org/debian bullseye/main amd64 libgdbm-compat4 amd64 1.19-2 [44.7 kB]
Get:4 http://deb.debian.org/debian bullseye/main amd64 libperl5.32 amd64 5.32.1-4+deb11u2 [4106 kB]
Get:5 http://deb.debian.org/debian bullseye/main amd64 perl amd64 5.32.1-4+deb11u2 [293 kB]
Get:6 http://deb.debian.org/debian bullseye/main amd64 pigz amd64 2.6-1 [64.0 kB]
Get:7 http://deb.debian.org/debian bullseye/main amd64 libapr1 amd64 1.7.0-6+deb11u1 [106 kB]
Get:8 http://deb.debian.org/debian bullseye/main amd64 libaprutil1 amd64 1.6.1-5 [92.1 kB]
Get:9 http://deb.debian.org/debian bullseye/main amd64 apache2-utils amd64 2.4.53-1~deb11u1 [259 kB]
Get:10 http://deb.debian.org/debian bullseye/main amd64 dbus-user-session amd64 1.12.20-2 [96.2 kB]
Get:11 http://deb.debian.org/debian bullseye/main amd64 python3-pkg-resources all 52.0.0-4 [190 kB]
Get:12 http://deb.debian.org/debian bullseye/main amd64 python3-cached-property all 1.5.2-1 [12.5 kB]
Get:13 http://deb.debian.org/debian bullseye/main amd64 python3-lib2to3 all 3.9.2-1 [77.8 kB]
Get:14 http://deb.debian.org/debian bullseye/main amd64 python3-distutils all 3.9.2-1 [143 kB]
Get:15 http://deb.debian.org/debian bullseye/main amd64 python3-certifi all 2020.6.20-1 [151 kB]
Get:16 http://deb.debian.org/debian bullseye/main amd64 python3-chardet all 4.0.0-1 [99.0 kB]
Get:17 http://deb.debian.org/debian bullseye/main amd64 python3-idna all 2.10-1 [37.4 kB]
Get:18 http://deb.debian.org/debian bullseye/main amd64 python3-six all 1.16.0-2 [17.5 kB]
Get:19 http://deb.debian.org/debian bullseye/main amd64 python3-urllib3 all 1.26.5-1~exp1 [114 kB]
Get:20 http://deb.debian.org/debian bullseye/main amd64 python3-requests all 2.25.1+dfsg-2 [69.3 kB]
Get:21 http://deb.debian.org/debian bullseye/main amd64 python3-websocket all 0.57.0-1 [34.3 kB]
Get:22 http://deb.debian.org/debian bullseye/main amd64 python3-docker all 4.1.0-1.2 [85.2 kB]
Get:23 http://deb.debian.org/debian bullseye/main amd64 python3-dockerpty all 0.4.1-2 [11.1 kB]
Get:24 http://deb.debian.org/debian bullseye/main amd64 python3-docopt all 0.6.2-3 [26.6 kB]
Get:25 http://deb.debian.org/debian bullseye/main amd64 python3-attr all 20.3.0-1 [52.9 kB]
Get:26 http://deb.debian.org/debian bullseye/main amd64 python3-more-itertools all 4.2.0-3 [42.7 kB]
Get:27 http://deb.debian.org/debian bullseye/main amd64 python3-zipp all 1.0.0-3 [6060 B]
Get:28 http://deb.debian.org/debian bullseye/main amd64 python3-importlib-metadata all 1.6.0-2 [10.3 kB]
Get:29 https://download.docker.com/linux/debian bullseye/stable amd64 docker-ce-cli amd64 5:20.10.16~3-0~debian-bullseye [40.6 MB]
Get:30 http://deb.debian.org/debian bullseye/main amd64 python3-setuptools all 52.0.0-4 [366 kB]
Get:31 http://deb.debian.org/debian bullseye/main amd64 python3-pyrsistent amd64 0.15.5-1+b3 [59.1 kB]
Get:32 http://deb.debian.org/debian bullseye/main amd64 python3-jsonschema all 3.2.0-3 [46.3 kB]
Get:33 http://deb.debian.org/debian bullseye/main amd64 python3-texttable all 1.6.3-2 [12.4 kB]
Get:34 http://deb.debian.org/debian bullseye/main amd64 libyaml-0-2 amd64 0.2.2-1 [49.6 kB]
Get:35 http://deb.debian.org/debian bullseye/main amd64 python3-yaml amd64 5.3.1-5 [138 kB]
Get:36 http://deb.debian.org/debian bullseye/main amd64 docker-compose all 1.25.0-1 [119 kB]
Get:37 http://deb.debian.org/debian bullseye/main amd64 libcurl3-gnutls amd64 7.74.0-1.3+deb11u1 [338 kB]
Get:38 http://deb.debian.org/debian bullseye/main amd64 liberror-perl all 0.17029-1 [31.0 kB]
Get:39 http://deb.debian.org/debian bullseye/main amd64 git-man all 1:2.30.2-1 [1827 kB]
Get:40 http://deb.debian.org/debian bullseye/main amd64 git amd64 1:2.30.2-1 [5527 kB]
Get:41 http://deb.debian.org/debian bullseye/main amd64 libltdl7 amd64 2.4.6-15 [391 kB]
Get:42 http://deb.debian.org/debian bullseye/main amd64 libslirp0 amd64 4.4.0-1+deb11u2 [57.9 kB]
Get:43 http://deb.debian.org/debian bullseye/main amd64 patch amd64 2.7.6-7 [128 kB]
Get:44 http://deb.debian.org/debian bullseye/main amd64 slirp4netns amd64 1.0.1-2 [33.4 kB]
Get:45 https://download.docker.com/linux/debian bullseye/stable amd64 docker-ce amd64 5:20.10.16~3-0~debian-bullseye [21.0 MB]
Get:46 https://download.docker.com/linux/debian bullseye/stable amd64 docker-ce-rootless-extras amd64 5:20.10.16~3-0~debian-bullseye [8157 kB]
Get:47 https://download.docker.com/linux/debian bullseye/stable amd64 docker-compose-plugin amd64 2.5.0~debian-bullseye [6554 kB]
Get:48 https://download.docker.com/linux/debian bullseye/stable amd64 docker-scan-plugin amd64 0.17.0~debian-bullseye [3520 kB]
Fetched 126 MB in 2s (53.4 MB/s)
Extracting templates from packages: 100%
Selecting previously unselected package perl-modules-5.32.
(Reading database ... 52525 files and directories currently installed.)
Preparing to unpack .../00-perl-modules-5.32_5.32.1-4+deb11u2_all.deb ...
Unpacking perl-modules-5.32 (5.32.1-4+deb11u2) ...
Selecting previously unselected package libgdbm-compat4:amd64.
Preparing to unpack .../01-libgdbm-compat4_1.19-2_amd64.deb ...
Unpacking libgdbm-compat4:amd64 (1.19-2) ...
Selecting previously unselected package libperl5.32:amd64.
Preparing to unpack .../02-libperl5.32_5.32.1-4+deb11u2_amd64.deb ...
Unpacking libperl5.32:amd64 (5.32.1-4+deb11u2) ...
Selecting previously unselected package perl.
Preparing to unpack .../03-perl_5.32.1-4+deb11u2_amd64.deb ...
Unpacking perl (5.32.1-4+deb11u2) ...
Selecting previously unselected package pigz.
Preparing to unpack .../04-pigz_2.6-1_amd64.deb ...
Unpacking pigz (2.6-1) ...
Selecting previously unselected package libapr1:amd64.
Preparing to unpack .../05-libapr1_1.7.0-6+deb11u1_amd64.deb ...
Unpacking libapr1:amd64 (1.7.0-6+deb11u1) ...
Selecting previously unselected package libaprutil1:amd64.
Preparing to unpack .../06-libaprutil1_1.6.1-5_amd64.deb ...
Unpacking libaprutil1:amd64 (1.6.1-5) ...
Selecting previously unselected package apache2-utils.
Preparing to unpack .../07-apache2-utils_2.4.53-1~deb11u1_amd64.deb ...
Unpacking apache2-utils (2.4.53-1~deb11u1) ...
Selecting previously unselected package containerd.io.
Preparing to unpack .../08-containerd.io_1.6.4-1_amd64.deb ...
Unpacking containerd.io (1.6.4-1) ...
Selecting previously unselected package dbus-user-session.
Preparing to unpack .../09-dbus-user-session_1.12.20-2_amd64.deb ...
Unpacking dbus-user-session (1.12.20-2) ...
Selecting previously unselected package docker-ce-cli.
Preparing to unpack .../10-docker-ce-cli_5%3a20.10.16~3-0~debian-bullseye_amd64.deb ...
Unpacking docker-ce-cli (5:20.10.16~3-0~debian-bullseye) ...
Selecting previously unselected package docker-ce.
Preparing to unpack .../11-docker-ce_5%3a20.10.16~3-0~debian-bullseye_amd64.deb ...
Unpacking docker-ce (5:20.10.16~3-0~debian-bullseye) ...
Selecting previously unselected package docker-ce-rootless-extras.
Preparing to unpack .../12-docker-ce-rootless-extras_5%3a20.10.16~3-0~debian-bullseye_amd64.deb ...
Unpacking docker-ce-rootless-extras (5:20.10.16~3-0~debian-bullseye) ...
Selecting previously unselected package python3-pkg-resources.
Preparing to unpack .../13-python3-pkg-resources_52.0.0-4_all.deb ...
Unpacking python3-pkg-resources (52.0.0-4) ...
Selecting previously unselected package python3-cached-property.
Preparing to unpack .../14-python3-cached-property_1.5.2-1_all.deb ...
Unpacking python3-cached-property (1.5.2-1) ...
Selecting previously unselected package python3-lib2to3.
Preparing to unpack .../15-python3-lib2to3_3.9.2-1_all.deb ...
Unpacking python3-lib2to3 (3.9.2-1) ...
Selecting previously unselected package python3-distutils.
Preparing to unpack .../16-python3-distutils_3.9.2-1_all.deb ...
Unpacking python3-distutils (3.9.2-1) ...
Selecting previously unselected package python3-certifi.
Preparing to unpack .../17-python3-certifi_2020.6.20-1_all.deb ...
Unpacking python3-certifi (2020.6.20-1) ...
Selecting previously unselected package python3-chardet.
Preparing to unpack .../18-python3-chardet_4.0.0-1_all.deb ...
Unpacking python3-chardet (4.0.0-1) ...
Selecting previously unselected package python3-idna.
Preparing to unpack .../19-python3-idna_2.10-1_all.deb ...
Unpacking python3-idna (2.10-1) ...
Selecting previously unselected package python3-six.
Preparing to unpack .../20-python3-six_1.16.0-2_all.deb ...
Unpacking python3-six (1.16.0-2) ...
Selecting previously unselected package python3-urllib3.
Preparing to unpack .../21-python3-urllib3_1.26.5-1~exp1_all.deb ...
Unpacking python3-urllib3 (1.26.5-1~exp1) ...
Selecting previously unselected package python3-requests.
Preparing to unpack .../22-python3-requests_2.25.1+dfsg-2_all.deb ...
Unpacking python3-requests (2.25.1+dfsg-2) ...
Selecting previously unselected package python3-websocket.
Preparing to unpack .../23-python3-websocket_0.57.0-1_all.deb ...
Unpacking python3-websocket (0.57.0-1) ...
Selecting previously unselected package python3-docker.
Preparing to unpack .../24-python3-docker_4.1.0-1.2_all.deb ...
Unpacking python3-docker (4.1.0-1.2) ...
Selecting previously unselected package python3-dockerpty.
Preparing to unpack .../25-python3-dockerpty_0.4.1-2_all.deb ...
Unpacking python3-dockerpty (0.4.1-2) ...
Selecting previously unselected package python3-docopt.
Preparing to unpack .../26-python3-docopt_0.6.2-3_all.deb ...
Unpacking python3-docopt (0.6.2-3) ...
Selecting previously unselected package python3-attr.
Preparing to unpack .../27-python3-attr_20.3.0-1_all.deb ...
Unpacking python3-attr (20.3.0-1) ...
Selecting previously unselected package python3-more-itertools.
Preparing to unpack .../28-python3-more-itertools_4.2.0-3_all.deb ...
Unpacking python3-more-itertools (4.2.0-3) ...
Selecting previously unselected package python3-zipp.
Preparing to unpack .../29-python3-zipp_1.0.0-3_all.deb ...
Unpacking python3-zipp (1.0.0-3) ...
Selecting previously unselected package python3-importlib-metadata.
Preparing to unpack .../30-python3-importlib-metadata_1.6.0-2_all.deb ...
Unpacking python3-importlib-metadata (1.6.0-2) ...
Selecting previously unselected package python3-setuptools.
Preparing to unpack .../31-python3-setuptools_52.0.0-4_all.deb ...
Unpacking python3-setuptools (52.0.0-4) ...
Selecting previously unselected package python3-pyrsistent:amd64.
Preparing to unpack .../32-python3-pyrsistent_0.15.5-1+b3_amd64.deb ...
Unpacking python3-pyrsistent:amd64 (0.15.5-1+b3) ...
Selecting previously unselected package python3-jsonschema.
Preparing to unpack .../33-python3-jsonschema_3.2.0-3_all.deb ...
Unpacking python3-jsonschema (3.2.0-3) ...
Selecting previously unselected package python3-texttable.
Preparing to unpack .../34-python3-texttable_1.6.3-2_all.deb ...
Unpacking python3-texttable (1.6.3-2) ...
Selecting previously unselected package libyaml-0-2:amd64.
Preparing to unpack .../35-libyaml-0-2_0.2.2-1_amd64.deb ...
Unpacking libyaml-0-2:amd64 (0.2.2-1) ...
Selecting previously unselected package python3-yaml.
Preparing to unpack .../36-python3-yaml_5.3.1-5_amd64.deb ...
Unpacking python3-yaml (5.3.1-5) ...
Selecting previously unselected package docker-compose.
Preparing to unpack .../37-docker-compose_1.25.0-1_all.deb ...
Unpacking docker-compose (1.25.0-1) ...
Selecting previously unselected package docker-compose-plugin.
Preparing to unpack .../38-docker-compose-plugin_2.5.0~debian-bullseye_amd64.deb ...
Unpacking docker-compose-plugin (2.5.0~debian-bullseye) ...
Selecting previously unselected package docker-scan-plugin.
Preparing to unpack .../39-docker-scan-plugin_0.17.0~debian-bullseye_amd64.deb ...
Unpacking docker-scan-plugin (0.17.0~debian-bullseye) ...
Selecting previously unselected package libcurl3-gnutls:amd64.
Preparing to unpack .../40-libcurl3-gnutls_7.74.0-1.3+deb11u1_amd64.deb ...
Unpacking libcurl3-gnutls:amd64 (7.74.0-1.3+deb11u1) ...
Selecting previously unselected package liberror-perl.
Preparing to unpack .../41-liberror-perl_0.17029-1_all.deb ...
Unpacking liberror-perl (0.17029-1) ...
Selecting previously unselected package git-man.
Preparing to unpack .../42-git-man_1%3a2.30.2-1_all.deb ...
Unpacking git-man (1:2.30.2-1) ...
Selecting previously unselected package git.
Preparing to unpack .../43-git_1%3a2.30.2-1_amd64.deb ...
Unpacking git (1:2.30.2-1) ...
Selecting previously unselected package libltdl7:amd64.
Preparing to unpack .../44-libltdl7_2.4.6-15_amd64.deb ...
Unpacking libltdl7:amd64 (2.4.6-15) ...
Selecting previously unselected package libslirp0:amd64.
Preparing to unpack .../45-libslirp0_4.4.0-1+deb11u2_amd64.deb ...
Unpacking libslirp0:amd64 (4.4.0-1+deb11u2) ...
Selecting previously unselected package patch.
Preparing to unpack .../46-patch_2.7.6-7_amd64.deb ...
Unpacking patch (2.7.6-7) ...
Selecting previously unselected package slirp4netns.
Preparing to unpack .../47-slirp4netns_1.0.1-2_amd64.deb ...
Unpacking slirp4netns (1.0.1-2) ...
Setting up python3-pkg-resources (52.0.0-4) ...
Setting up python3-cached-property (1.5.2-1) ...
Setting up python3-attr (20.3.0-1) ...
Setting up python3-texttable (1.6.3-2) ...
Setting up python3-docopt (0.6.2-3) ...
Setting up libyaml-0-2:amd64 (0.2.2-1) ...
Setting up docker-scan-plugin (0.17.0~debian-bullseye) ...
Setting up perl-modules-5.32 (5.32.1-4+deb11u2) ...
Setting up libapr1:amd64 (1.7.0-6+deb11u1) ...
Setting up python3-yaml (5.3.1-5) ...
Setting up libcurl3-gnutls:amd64 (7.74.0-1.3+deb11u1) ...
Setting up python3-six (1.16.0-2) ...
Setting up dbus-user-session (1.12.20-2) ...
Setting up python3-chardet (4.0.0-1) ...
Setting up python3-certifi (2020.6.20-1) ...
Setting up python3-idna (2.10-1) ...
Setting up containerd.io (1.6.4-1) ...
Created symlink /etc/systemd/system/multi-user.target.wants/containerd.service → /lib/systemd/system/containerd.service.
Setting up patch (2.7.6-7) ...
Setting up libgdbm-compat4:amd64 (1.19-2) ...
Setting up docker-compose-plugin (2.5.0~debian-bullseye) ...
Setting up libperl5.32:amd64 (5.32.1-4+deb11u2) ...
Setting up libltdl7:amd64 (2.4.6-15) ...
Setting up python3-urllib3 (1.26.5-1~exp1) ...
Setting up docker-ce-cli (5:20.10.16~3-0~debian-bullseye) ...
Setting up python3-pyrsistent:amd64 (0.15.5-1+b3) ...
Setting up libslirp0:amd64 (4.4.0-1+deb11u2) ...
Setting up pigz (2.6-1) ...
Setting up git-man (1:2.30.2-1) ...
Setting up docker-ce-rootless-extras (5:20.10.16~3-0~debian-bullseye) ...
Setting up python3-lib2to3 (3.9.2-1) ...
Setting up python3-websocket (0.57.0-1) ...
update-alternatives: using /usr/bin/python3-wsdump to provide /usr/bin/wsdump (wsdump) in auto mode
Setting up python3-dockerpty (0.4.1-2) ...
Setting up libaprutil1:amd64 (1.6.1-5) ...
Setting up python3-distutils (3.9.2-1) ...
Setting up python3-more-itertools (4.2.0-3) ...
Setting up python3-setuptools (52.0.0-4) ...
Setting up slirp4netns (1.0.1-2) ...
Setting up python3-zipp (1.0.0-3) ...
Setting up perl (5.32.1-4+deb11u2) ...
Setting up docker-ce (5:20.10.16~3-0~debian-bullseye) ...
Created symlink /etc/systemd/system/multi-user.target.wants/docker.service → /lib/systemd/system/docker.service.
Created symlink /etc/systemd/system/sockets.target.wants/docker.socket → /lib/systemd/system/docker.socket.
Setting up python3-requests (2.25.1+dfsg-2) ...
Setting up apache2-utils (2.4.53-1~deb11u1) ...
Setting up python3-importlib-metadata (1.6.0-2) ...
Setting up python3-docker (4.1.0-1.2) ...
Setting up liberror-perl (0.17029-1) ...
Setting up python3-jsonschema (3.2.0-3) ...
Setting up git (1:2.30.2-1) ...
Setting up docker-compose (1.25.0-1) ...
Processing triggers for man-db (2.9.4-2) ...
Processing triggers for libc-bin (2.31-13+deb11u3) ...
andreas_faerber@docker-teslamate:~$
(auf das Dreieck klicken um die Ausführung auf der Console zu sehen)
Testen ob die Docker Installation erfolgreich war:
sudo docker run hello-world
Ausgaben auf der Konsole:
andreas_faerber@docker-teslamate:~$ sudo docker run hello-world
Unable to find image 'hello-world:latest' locally
latest: Pulling from library/hello-world
2db29710123e: Pull complete
Digest: sha256:80f31da1ac7b312ba29d65080fddf797dd76acfb870e677f390d5acba9741b17
Status: Downloaded newer image for hello-world:latest

Hello from Docker!
This message shows that your installation appears to be working correctly.

To generate this message, Docker took the following steps:
 1. The Docker client contacted the Docker daemon.
 2. The Docker daemon pulled the "hello-world" image from the Docker Hub.
    (amd64)
 3. The Docker daemon created a new container from that image which runs the
    executable that produces the output you are currently reading.
 4. The Docker daemon streamed that output to the Docker client, which sent it
    to your terminal.

To try something more ambitious, you can run an Ubuntu container with:
 $ docker run -it ubuntu bash

Share images, automate workflows, and more with a free Docker ID:
 https://hub.docker.com/

For more examples and ideas, visit:
 https://docs.docker.com/get-started/

andreas_faerber@docker-teslamate:~$
(auf das Dreieck klicken um die Ausführung auf der Console zu sehen)
Wenn ihr eine ähnliche Ausgabe bekommt, dann sieht bis hier alles gut aus.
Teslamate installieren und konfigurieren
Im Folgenden erstellt ihr eine docker-compose.yml Datei, über die wir dann Teslamate mit Parametern versorgen und starten.
Benutzte Kommandos:
mkdir docker-teslamate

cd docker-teslamate

mkdir import

sudo mkdir -p /docker-data/teslamate/teslamate-db

sudo mkdir -p /docker-data/teslamate/grafana-data

sudo mkdir -p /docker-data/teslamate/mosquitto-conf

sudo mkdir -p  /docker-data/teslamate/mosquitto-data

curl -o ~/docker-teslamate/docker-compose.yml https://blog.abgefaerbt.de/assets/files/teslamate-docker-compose.yml

curl -o ~/docker-teslamate/docker-compose.override.yml https://blog.abgefaerbt.de/assets/files/teslamate-docker-compose.override.yml

curl -o ~/docker-teslamate/.env https://blog.abgefaerbt.de/assets/files/teslamate.env
Ausgaben auf der Konsole:
andreas_faerber@docker-teslamate:~$ mkdir docker-teslamate
andreas_faerber@docker-teslamate:~$
andreas_faerber@docker-teslamate:~$ cd docker-teslamate/
andreas_faerber@docker-teslamate:~/docker-teslamate$
andreas_faerber@docker-teslamate:~/docker-teslamate$ mkdir import
andreas_faerber@docker-teslamate:~/docker-teslamate$
andreas_faerber@docker-teslamate:~/docker-teslamate$ sudo mkdir -p /docker-data/teslamate/teslamate-db
andreas_faerber@docker-teslamate:~/docker-teslamate$
andreas_faerber@docker-teslamate:~/docker-teslamate$ sudo mkdir -p /docker-data/teslamate/grafana-data
andreas_faerber@docker-teslamate:~/docker-teslamate$
andreas_faerber@docker-teslamate:~/docker-teslamate$ sudo mkdir -p /docker-data/teslamate/mosquitto-conf
andreas_faerber@docker-teslamate:~/docker-teslamate$
andreas_faerber@docker-teslamate:~/docker-teslamate$ sudo mkdir -p  /docker-data/teslamate/mosquitto-data
andreas_faerber@docker-teslamate:~/docker-teslamate$
andreas_faerber@docker-teslamate:~/docker-teslamate$ curl -o ~/docker-teslamate/docker-compose.yml https://blog.abgefaerbt.de/assets/files/teslamate-docker-compose.yml
  % Total    % Received % Xferd  Average Speed   Time    Time     Time  Current
                                 Dload  Upload   Total   Spent    Left  Speed
100  1397  100  1397    0     0  11641      0 --:--:-- --:--:-- --:--:-- 11641
andreas_faerber@docker-teslamate:~/docker-teslamate$ curl -o ~/docker-teslamate/docker-compose.override.yml https://blog.abgefaerbt.de/assets/files/teslamate-docker-compose.override.yml
  % Total    % Received % Xferd  Average Speed   Time    Time     Time  Current
                                 Dload  Upload   Total   Spent    Left  Speed
100   497  100   497    0     0  10574      0 --:--:-- --:--:-- --:--:-- 10574
andreas_faerber@docker-teslamate:~/docker-teslamate$ curl -o ~/docker-teslamate/.env https://blog.abgefaerbt.de/assets/files/teslamate.env
  % Total    % Received % Xferd  Average Speed   Time    Time     Time  Current
                                 Dload  Upload   Total   Spent    Left  Speed
100  8795  100  8795    0     0   117k      0 --:--:-- --:--:-- --:--:--  122k
andreas_faerber@docker-teslamate:~/docker-teslamate$
(auf das Dreieck klicken um die Ausführung auf der Console zu sehen)
Anschließend mit muss die Datei “.env” editiert werden. Ohne vi-Kenntnisse ist wahrscheinlich nano der einfachste Einsteiger-Editor. Also in der Konsole:
nano .env
Dann macht ihr aus
TM_ENCRYPTION_KEY=Hier wild ein paar Zeichen eingeben
TM_DB_PASS=Hier auch
FQDN_TM=Hier euren DuckDNS Namen eingeben

TM_DB_USER=teslamate
TM_DB_NAME=teslamate

GRAFANA_USER=admin
GRAFANA_PW=admin

TM_TZ=Europe/Berlin

LETSENCRYPT_EMAIL=e.mail@adres.se
z.B. sowas:
TM_ENCRYPTION_KEY=gsgg45hz54zhegsjgksjgks
TM_DB_PASS=fjsiojwgejgigjwwvsvs
FQDN_TM=teslamate-afa.duckdns.org

TM_DB_USER=teslamate
TM_DB_NAME=teslamate

GRAFANA_USER=admin
GRAFANA_PW=admin

TM_TZ=Europe/Berlin

LETSENCRYPT_EMAIL=e.mail@adres.se
Um die Datei zu speichern drückt ihr ^X (Control-x), beantwortet die Frage mit “y” (y drücken) und bei “File Name to Write: .env” drückt ihr einfach Return. Dann solltet ihr wieder auf dem Prompt in der Konsole sein:
Ausgaben auf der Konsole:
andreas_faerber@docker-teslamate:~/docker-teslamate$ nano .env
andreas_faerber@docker-teslamate:~/docker-teslamate$
Jetzt legen wir ein Passwort für den späteren Zugriff über den Webbrowser an:
htpasswd -B -c .htpasswd teslamate
Ausgaben auf der Konsole:
andreas_faerber@docker-teslamate:~/docker-teslamate$ htpasswd -B -c .htpasswd teslamate
New password:
Re-type new password:
Adding password for user teslamate
andreas_faerber@docker-teslamate:~/docker-teslamate$
Jetzt starten wir Teslamate über Docker:
sudo docker-compose up -d
Ausgaben auf der Konsole:
andreas_faerber@docker-teslamate:~/docker-teslamate$ sudo docker-compose up -d
Creating network "docker-teslamate_default" with the default driver
Creating volume "docker-teslamate_teslamate-db" with default driver
Creating volume "docker-teslamate_teslamate-grafana-data" with default driver
Creating volume "docker-teslamate_mosquitto-conf" with default driver
Creating volume "docker-teslamate_mosquitto-data" with default driver
Pulling teslamate (teslamate/teslamate:1.26.1)...
1.26.1: Pulling from teslamate/teslamate
5eb5b503b376: Pull complete
995bf655f137: Pull complete
20132605df56: Pull complete
640521289aff: Pull complete
0cce55f0fb25: Pull complete
9a2f855c2a07: Pull complete
Digest: sha256:78f0c10be47bce292336b191fe2dff657b46019a7fdcf8bb6c19b1087aa5b11d
Status: Downloaded newer image for teslamate/teslamate:1.26.1
Pulling proxy (traefik:v2.4)...
v2.4: Pulling from library/traefik
ddad3d7c1e96: Pull complete
5f6722e60c2f: Pull complete
3abdcd3bb40c: Pull complete
fe4701c53ae5: Pull complete
Digest: sha256:840e948af3c8d1e45e986eee7d97004ab29cfccffdf0be4c116ba9aaeff5d17a
Status: Downloaded newer image for traefik:v2.4
Pulling mosquitto (eclipse-mosquitto:2)...
2: Pulling from library/eclipse-mosquitto
8663204ce13b: Pull complete
4b0834a78536: Pull complete
dd6d13dda626: Pull complete
Digest: sha256:43b90568c315eeae5cbdcd75ef41aa109aef2170bc714443fe3586d565783d18
Status: Downloaded newer image for eclipse-mosquitto:2
Pulling database (postgres:13)...
13: Pulling from library/postgres
42c077c10790: Pull complete
3c2843bc3122: Pull complete
12e1d6a2dd60: Pull complete
9ae1101c4068: Pull complete
fb05d2fd4701: Pull complete
9785a964a677: Pull complete
16fc798b0e72: Pull complete
f1a0bfa2327a: Pull complete
9b94c51b86e5: Pull complete
281df17c53d0: Pull complete
86476c34c389: Pull complete
d8bab0cdd17f: Pull complete
186eed38aeb6: Pull complete
Digest: sha256:a598b8679658e155020725d41601813cc8813429494514501e7f65f031774964
Status: Downloaded newer image for postgres:13
Pulling grafana (teslamate/grafana:latest)...
latest: Pulling from teslamate/grafana
59bf1c3509f3: Pull complete
dc6fd4c8b7cc: Pull complete
921cda16a84c: Pull complete
b2e847bc52f5: Pull complete
00a566fb83a4: Pull complete
a40995d122ce: Pull complete
dd54763fab15: Pull complete
e147c181ae77: Pull complete
cc6525936d2d: Pull complete
3cdad610e821: Pull complete
830da9ccd198: Pull complete
a73f99eb64d0: Pull complete
bcda8d2a859d: Pull complete
646a081eb622: Pull complete
361c67e16ec0: Pull complete
7b9632e72c20: Pull complete
7489ec05163e: Pull complete
e8d8cab38efd: Pull complete
3d9cb6996a8e: Pull complete
0b4b4fe8429d: Pull complete
Digest: sha256:c0db2e93b7eb89a532d78e29621e730797e2c21293ee7345679c8e095820d7aa
Status: Downloaded newer image for teslamate/grafana:latest
Creating docker-teslamate_proxy_1     ... done
Creating docker-teslamate_grafana_1   ... done
Creating docker-teslamate_database_1  ... done
Creating docker-teslamate_mosquitto_1 ... done
Creating docker-teslamate_teslamate_1 ... done
andreas_faerber@docker-teslamate:~/docker-teslamate$
(auf das Dreieck klicken um die Ausführung auf der Console zu sehen)
Wenn alles gut gegangen ist, dann läuft Teslamate jetzt:
sudo docker ps
Ausgaben auf der Konsole:
andreas_faerber@docker-teslamate:~/docker-teslamate$ sudo docker ps
CONTAINER ID   IMAGE                        COMMAND                  CREATED          STATUS          PORTS                    NAMES
06579f892103   teslamate/teslamate:1.26.1   "tini -- /bin/sh /en…"   11 minutes ago   Up 11 minutes   0.0.0.0:4000->4000/tcp   docker-teslamate_teslamate_1
df97c5c9f639   eclipse-mosquitto:2          "/docker-entrypoint.…"   11 minutes ago   Up 11 minutes   1883/tcp                 docker-teslamate_mosquitto_1
d277bca66304   postgres:13                  "docker-entrypoint.s…"   11 minutes ago   Up 11 minutes   5432/tcp                 docker-teslamate_database_1
874a3c0b3ab5   teslamate/grafana:latest     "/run.sh"                11 minutes ago   Up 11 minutes   0.0.0.0:3000->3000/tcp   docker-teslamate_grafana_1
andreas_faerber@docker-teslamate:~/docker-teslamate$
Wichtig ist, dass beim Status nichts von “Restarting” oder ähnliches steht.
Anschließend geben wir Port 80 und Port 443 auf der Firewall in der Google Console frei:
Auf 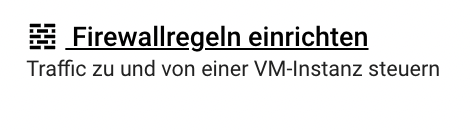 klicken und wie folgt einstellen:
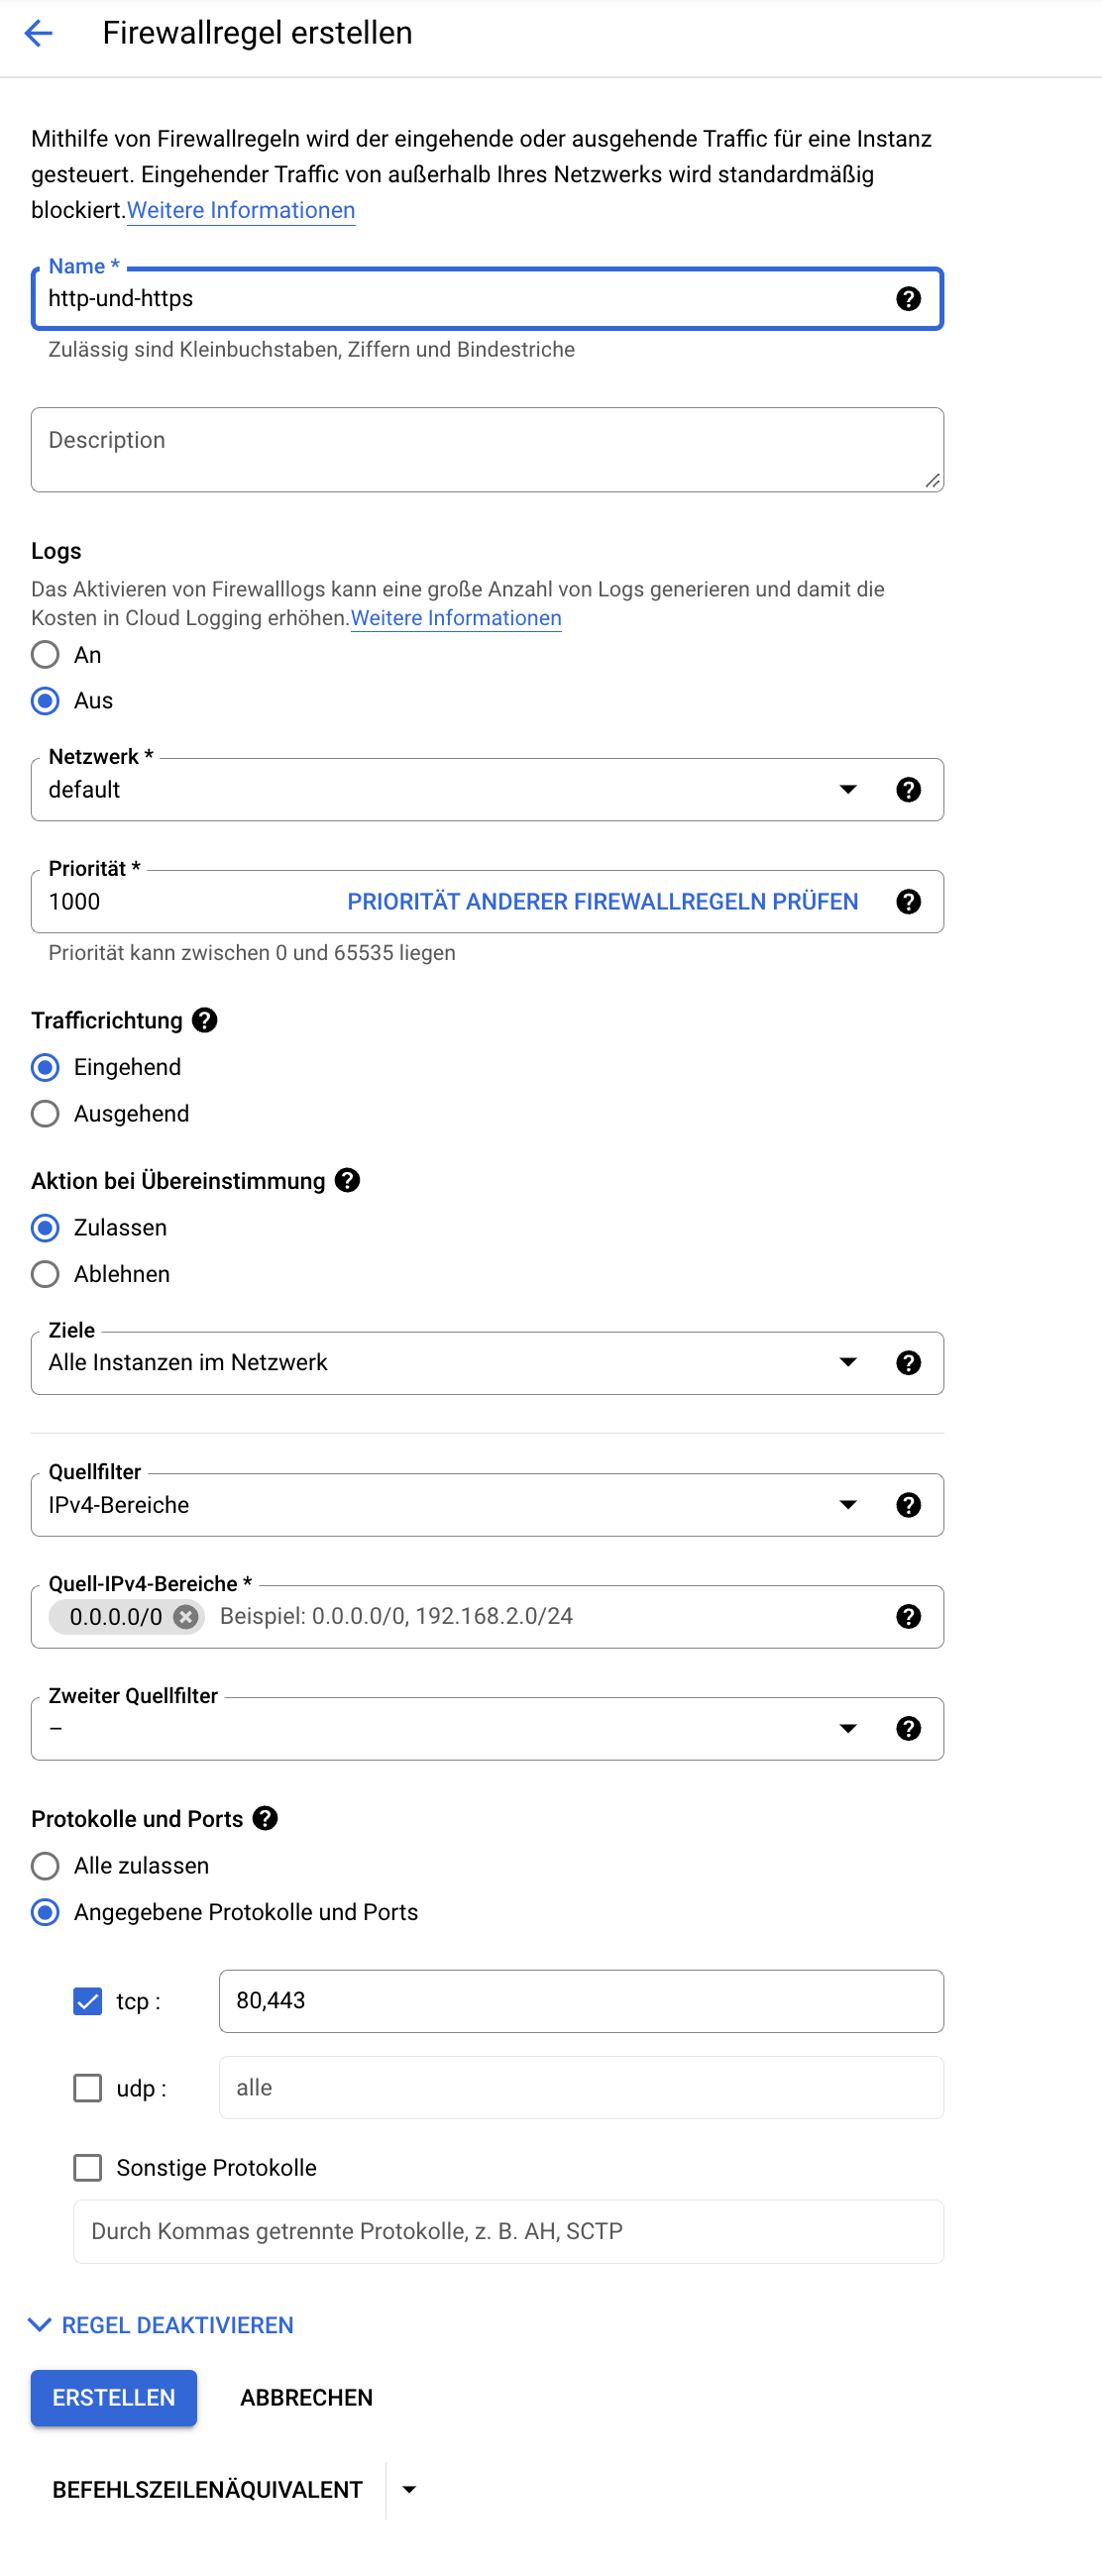
.. und auf “ERSTELLEN” klicken.
Teslamate: Erster Login
Hinweis: Idealerweise weckt ihr über die Tesla App euren Tesla einmal vorher auf.
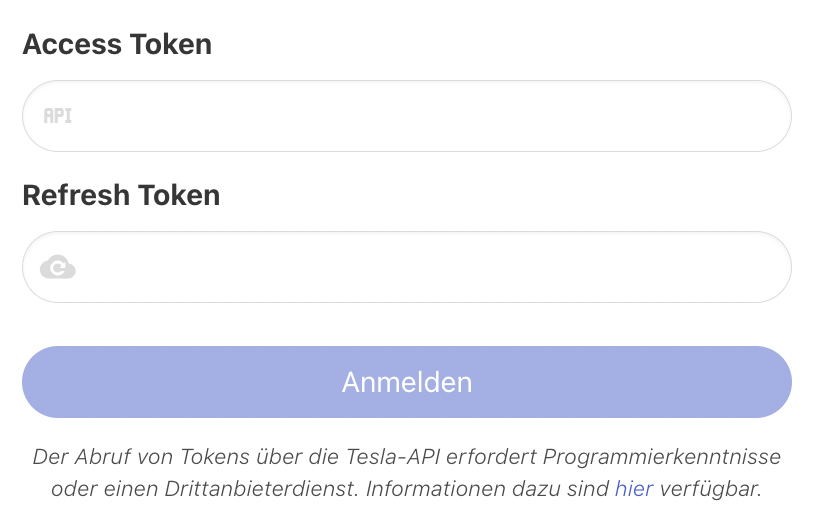
Unter https://euername.duckdns.org/ (siehe oben) könnt ihr jetzt das erste Mal eure Teslamate Installation aufrufen. Hierfür benutzt ihr den Benutzername und das Passwort welches ihr für das htpasswd Kommando genutzt und eingegeben habt. Anschließend müsst ihr einen Refresh und Access Token eingeben. Die bekommt ihr zum Beispiel über die iOS App “Auth for Tesla”. Am besten ruft ihr die Webseite das erste Mal übers Handy auf, so könnt ihr dann direkt die Tokens per Copy & Paste aus der App eingeben (Das muss man üblicherweise nur einmal machen).
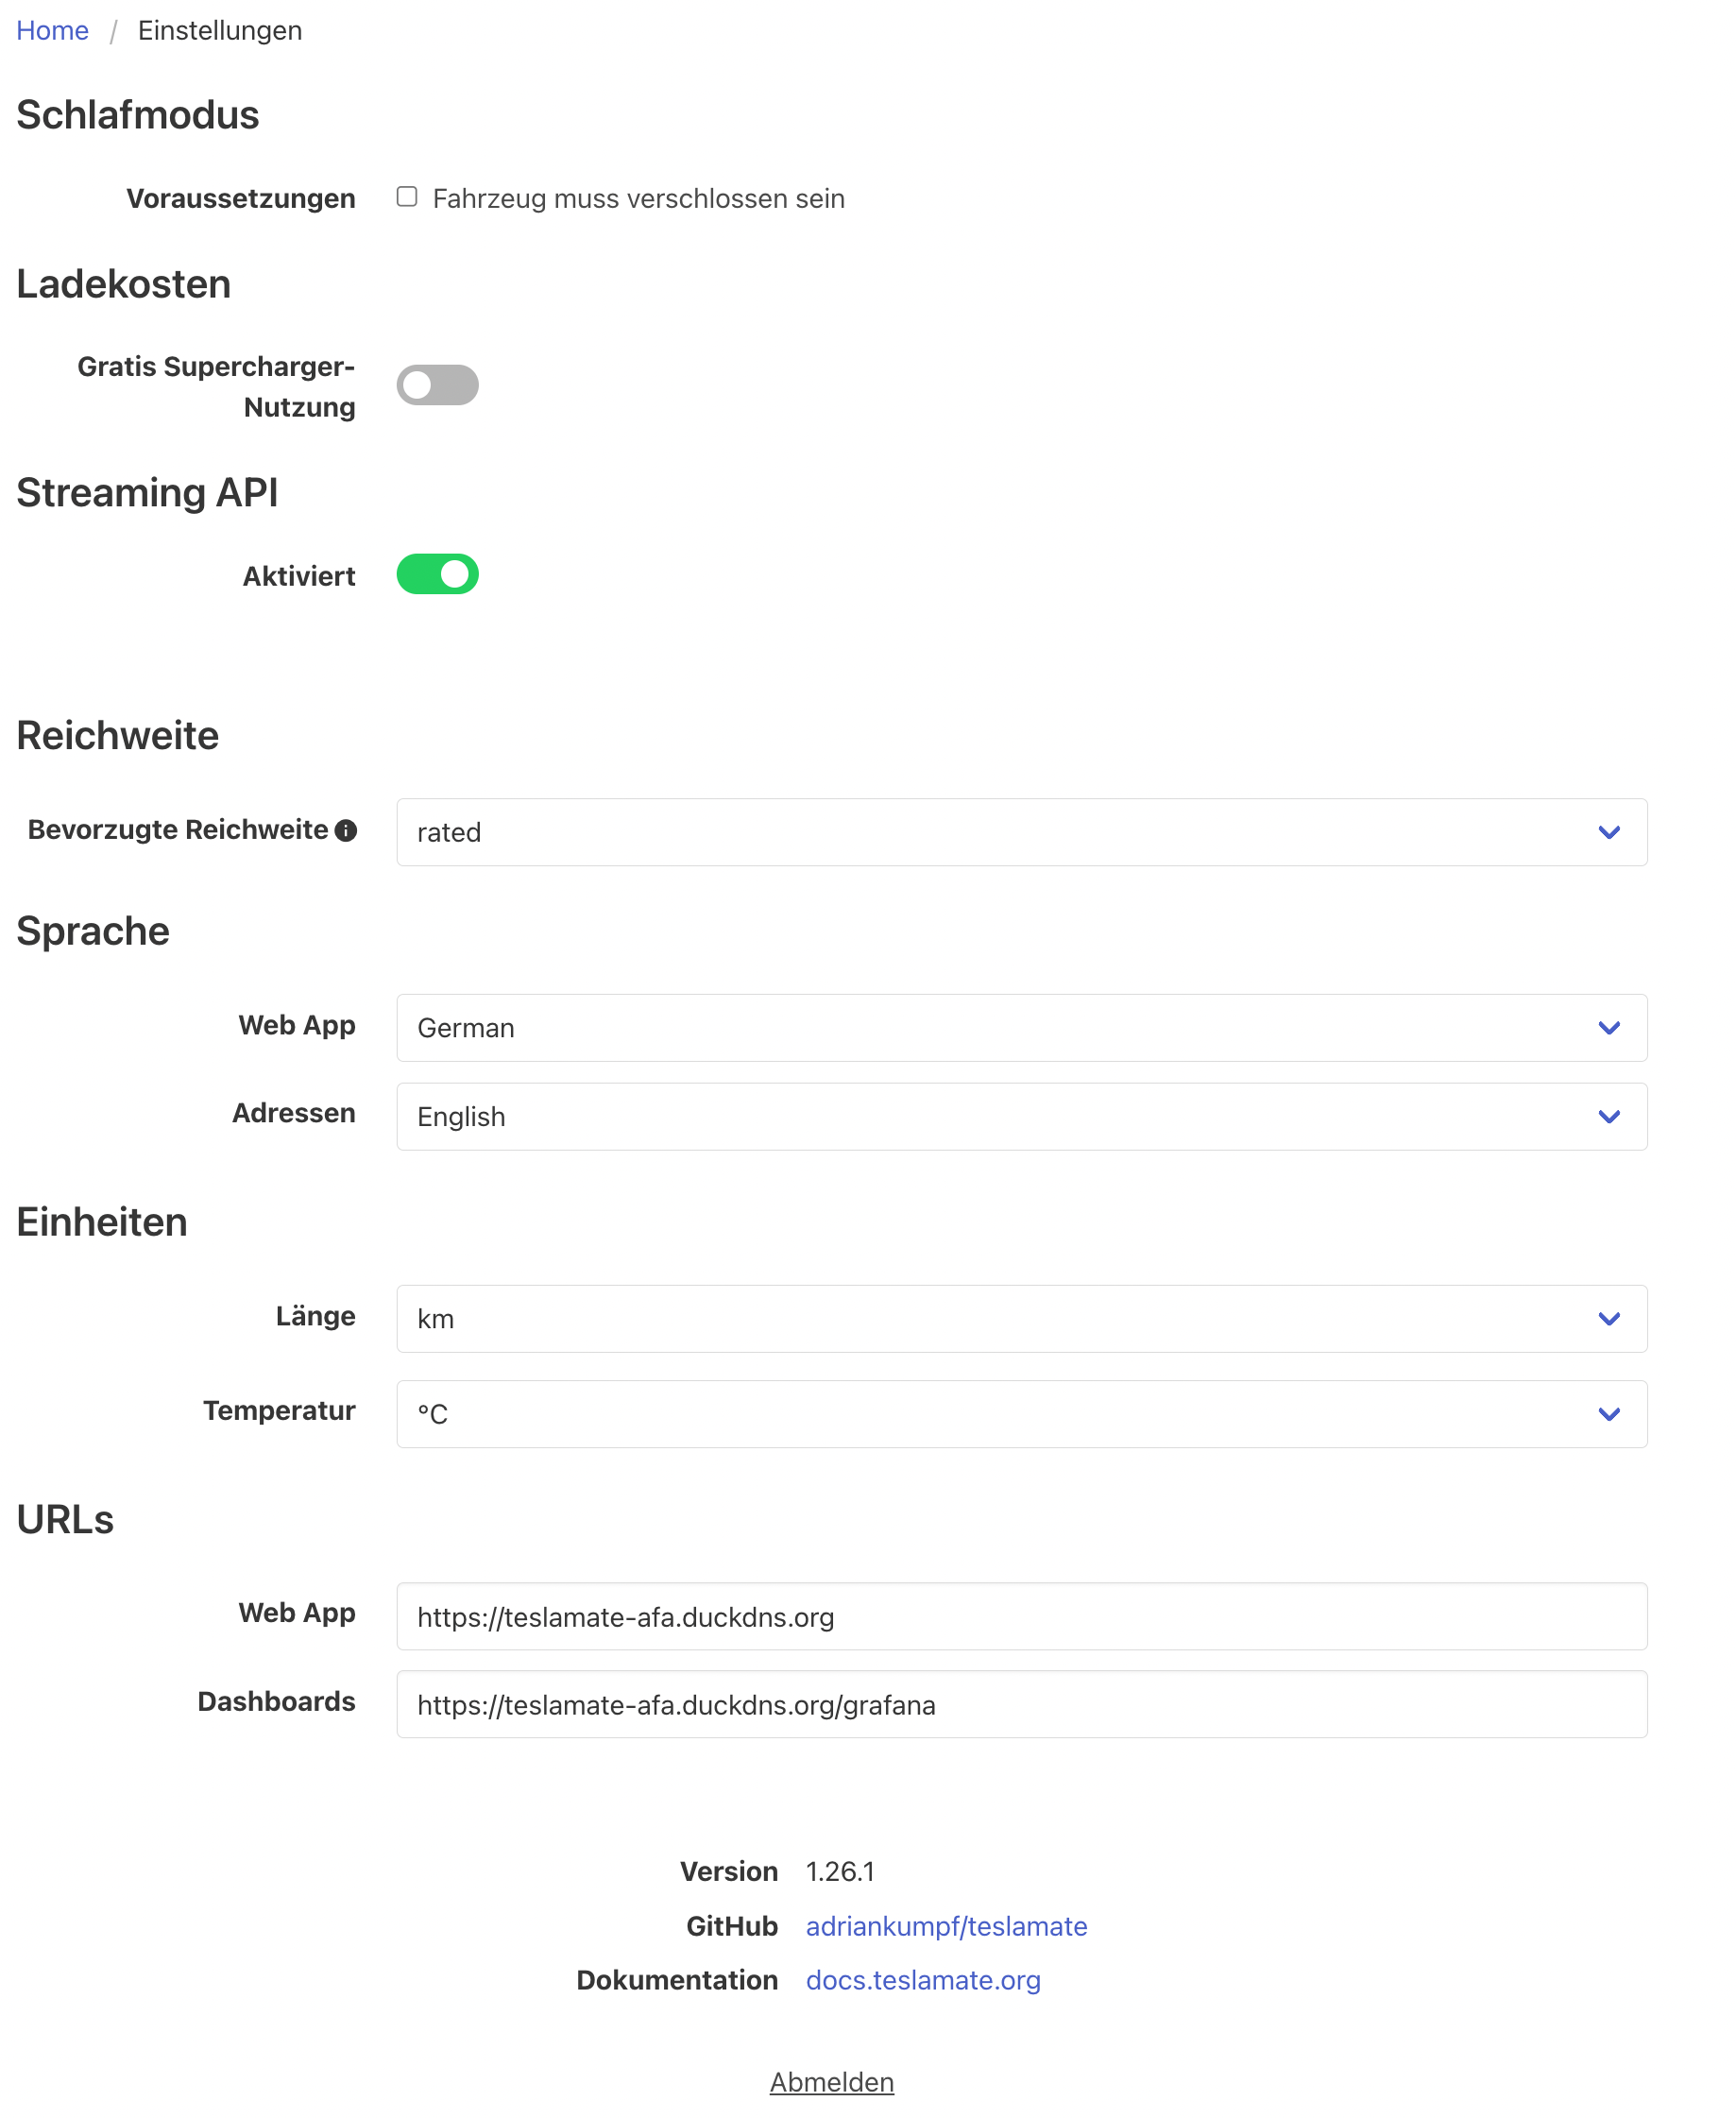
Anschließend konfiguriert ihr noch die Dashboard URL in den Einstellungen (unten bei Dashboards eintragen, die gleiche URL wie bei Web App und ein /grafana anhängen):
Seite neu laden und nun sollte es oben den Menüeintrag “Dashboards” geben.
Erster Aufruf Dashboards
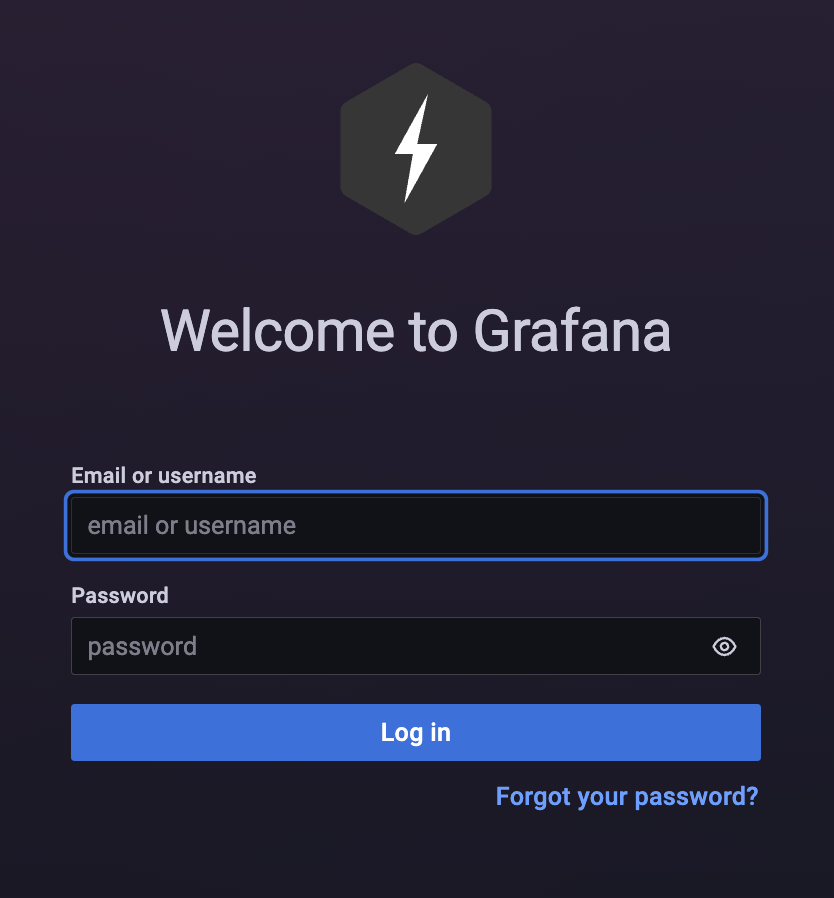
Wenn ihr auf den Dashboard Link geklickt habt, dann müsst ihr euch bei Grafana anmelden. Der erste Login ist hier admin als Benutzername und auch als Passwort. Anschließend müsst ihr ein neues Passwort vergeben.
Fertig
Voila!
Comments
Pascal
Servus, vielen Dank für deine Anleitung. Hat bei mir super funktioniert. Vielleicht kannst du noch einen Spenden-Knopf einrichten. Bin bestimmt nicht der einzige, der dir einen Kaffee ausgeben würde. Greetz
Martin
Hallo Andreas, Vielen Dank für die Super Anleitung! Hat prima geklappt! Ich würde gerne die Daten von der Teslamate VM über MQTT abrufen, allerdings kann ich mich nicht mit dem MQTT Broker verbinden. Den Port habe ich in docker-compose.yml eingetragen 1883:1883 und ein- und ausgehend in der Google Cloud Firewall eingetragen. Vielleicht habe ich dabei auch einen Fehler gemacht. Kannst du mir einen Tipp geben? Viele Grüße, Martin
Andreas
Hallo Martin, von wo möchtest du die Daten per MQTT abrufen? Von außerhalb der VM wäre mit der Port Öffnung keine so gute Idee, da dann ja jeder auf den Port zugreifen könnte, wenn du das nicht über die Firewall (z.B. mit statischer IP-Freigabe) schützen kannst. Von innerhalb der VM sollte das gehen. Kannst du per telnet auf den Port zugreifen?
David Koller
Hallo Andreas, super Anleitung, vielen Dank! Eine Frage, wenn ich auf die aktuelle Version von Teslamate updaten möchten, dann bekomme ich immer eine Bad Gateway Meldung anstatt der Teslamate Übersichtsseite. Hast du zufällig eine Idee dazu? Danke, lg David
Janny
Hallo, wie kann man überhaupt das Teslamate im Docker-Container aktualisieren? Ich komme gar nicht mehr über die Shell in die Docker-Umgebung. Wurde da bei Goolge Cloud was umgestellt? Vielen Dank für eine Info.
Andreas
Moin Janny, bekommst du eine bestimmte Fehlermeldung? Ich kann mich auf die Instanz noch entsprechend anmelden über die Google Cloud Console (wie in der Anleitung beschrieben)..
Thorsten
Hi Andreas, vielen dank für die geniale Anleitung! Hat perfekt funktioniert ohne das ich auch nur annähernd einen Plan davon hatte. Leider bekomme ich jedoch in den verschiedenen Dashboards von Grafana nirgends was angezeigt. Dauert das einfach, oder muss ich dann noch einstellen?
Andy
Super Anleitung! Vielen Dank.
Marco
Hi, Danke für die gute Anleitung. Hat alles funktioniert, nur habe ich zwei kleine Problemchen.
Danke für Hilfe :-)
Indy
Hi Andreas, zuerst einmal ein grosses Dankeschön für diese Anleitung! Ich hätte eine Frage und zwar gibt es ein Update für Teslamate (1.27.3). Was muss ich genau tun um dies korrekt auszuführen? Danke!
Andreas
Moin Indy! Für das Update habe ich gerade eine Kurzanleitung erstellt: https://blog.abgefaerbt.de/tesla/teslamate/2023/10/09/teslamate-google-cloud-update.html
Schau mal, ob das bei dir klappt!
Andreas
Hallo Marco, wegen dem Update schau mal den vorherigen Kommentar mit dem Link zur Update Anleitung. Bzgl https - schau mal, ob es nach dem Update klappt (Neustart). Eventuell hat das mit der Generierung des Zertifikates nicht geklappt. Wenn es nicht geklappt hat, weisst du, wie du das Logfile anschaust?
Indy
Hi Andreas. Danke vielmals! Hat geklappt, danke für deinen schnellen und lehrreichen support.
Simon
Hi Andreas, dank deiner Anleitung läuft meine Instanz bereits über ein Jahr. Allerdings ist sie sehr langsam resp. reagiert nicht, wenn man Statistiken über z.B. 1 Jahr anschauen will. Deswegen habe ich die VM nun auf e2-small gestellt (kostet natürlich mehr). Aber nun habe ich beim GCP gesehen, dass man auch direkt einen Container starten könnte, ohne dass man eine VM dafür bereitstellt. Würde das ungefähr ähnlich deiner Anleitung funktionieren? Vielen Dank
Andreas
Moin Simon, prinzipiell installiert man eine VM (virtuelle Maschine) auf der dann ein Container (per Docker) läuft. Das funktioniert natürlich prinzipiell auch dort. Allerdings ist die Anleitung dafür nicht gedacht. Der Hauptvorteil der Anleitung und VM ist, dass man auch als Anfänger relativ einfach damit umgehen kann. Das wird mit einer reinen Container Plattform schon schwieriger.
Kurzum: Wenn du dich mit GCP und Containern im Allgemeinen auskennst, könntest du dich daran orientieren. Sonst würde ich das eher später versuchen.. ;-)
Marc
Hallo Andreas, deine Anleitung funktioniert 1A. Falls man sich entscheidet von der Google Lösung (VM) auf einen Raspberry Pi zu wechseln, gibt es eine Möglichkeit die Daten zu transferieren (Backup bei der neuen Raspberry Pi Instanz einzuspielen)? Falls ja, wie müssten hier die Befehle lauten? Vielen Danke
Leave a Comment
Your email address will not be published. Required fields are marked *